This post contains affiliate links. When you purchase through our links, we may earn a commission.
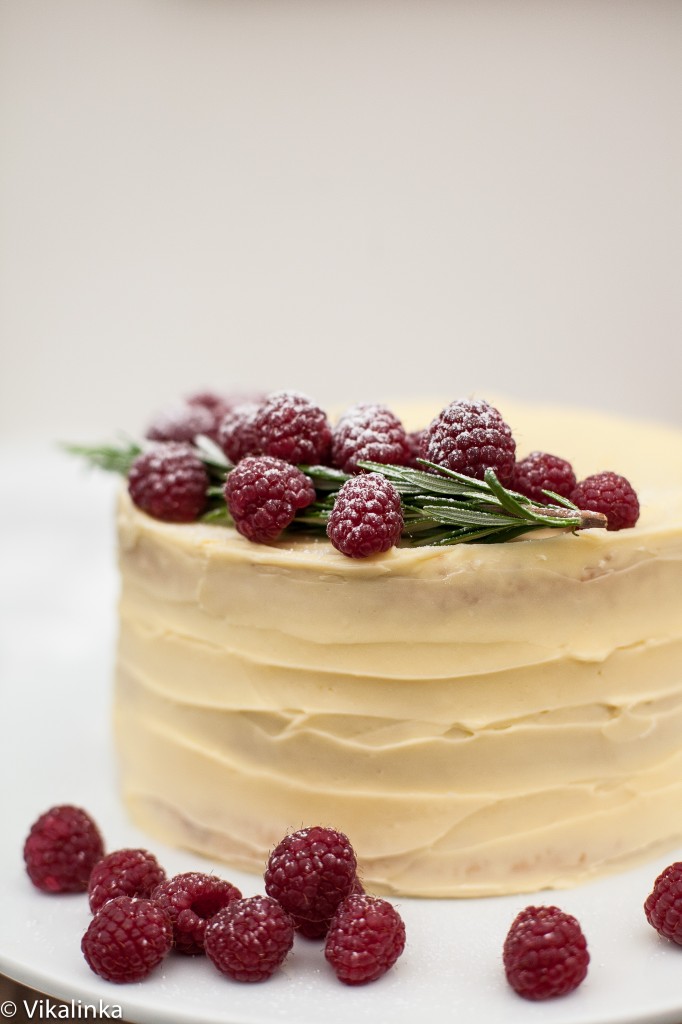
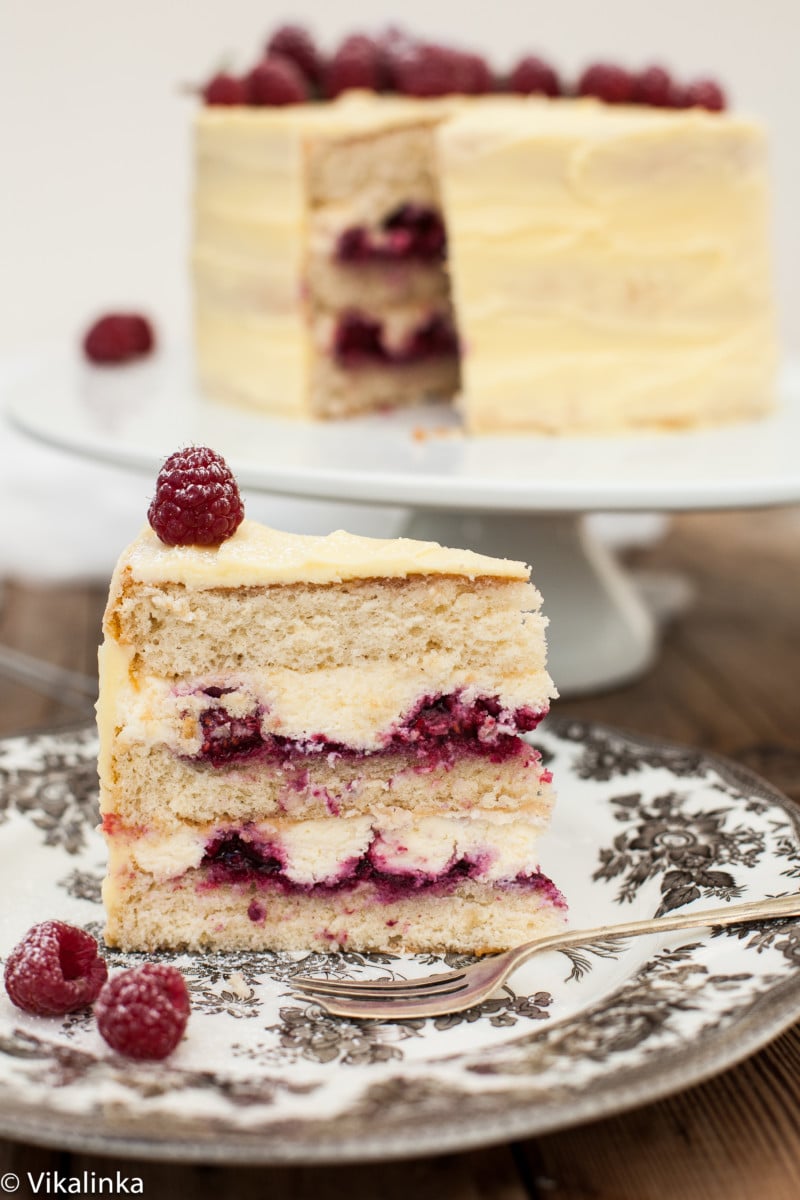
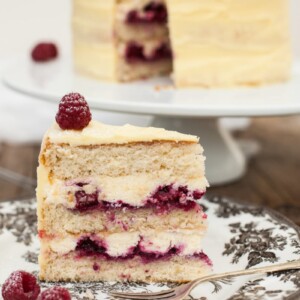
This Frostbitten raspberry cake is the cake for any celebration in any season! Three layers of vanilla sponge filled with raspberry compote and mascarpone frosting, covered in a creamy white chocolate frosting.
Find more delicious treats in our Christmas Dessert Collection!
I love all cakes I bake but some make the effort more worthwhile than others. This raspberry cake is off the scale magnificent!
I can’t even begin to describe the greatness of vanilla sponge cake filled with mascarpone and raspberry compote and frosted with white chocolate buttercream. It’s glorious.
After I took the first bite I was not at all resentful that I’d spent a good portion of Christmas Eve fussing in the kitchen. If this is what it takes for an amazing birthday cake then it is worth it!

To me a perfect cake should have at least two layers of moist sponge, a lovely compote and a luxuriously creamy icing that isn’t sickly sweet. Having these elements in perfect balance is the secret to a memorable cake.
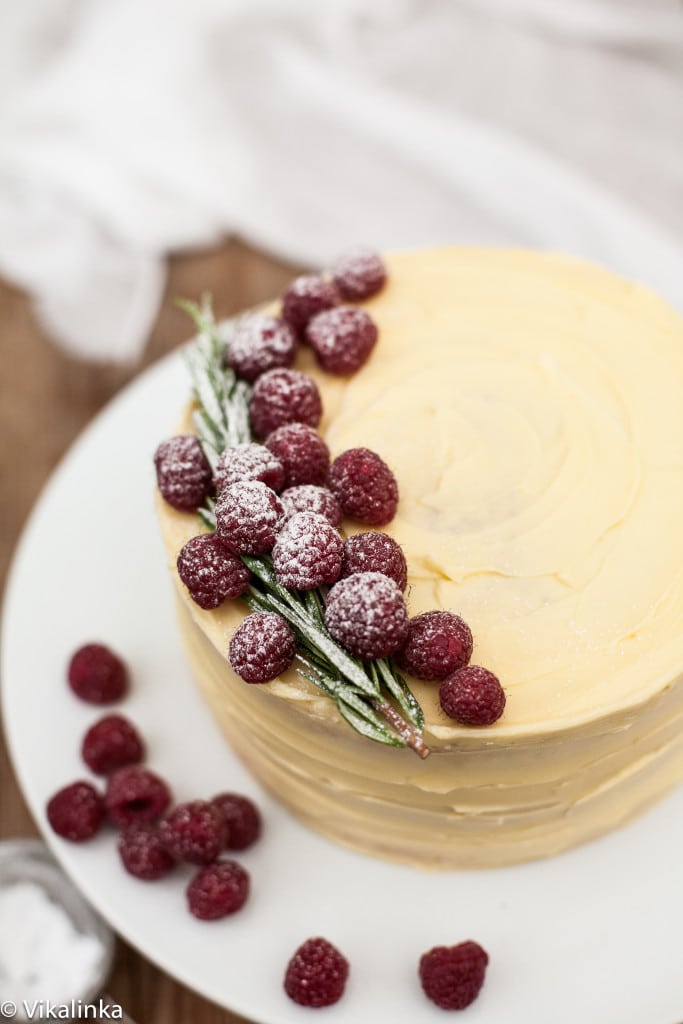
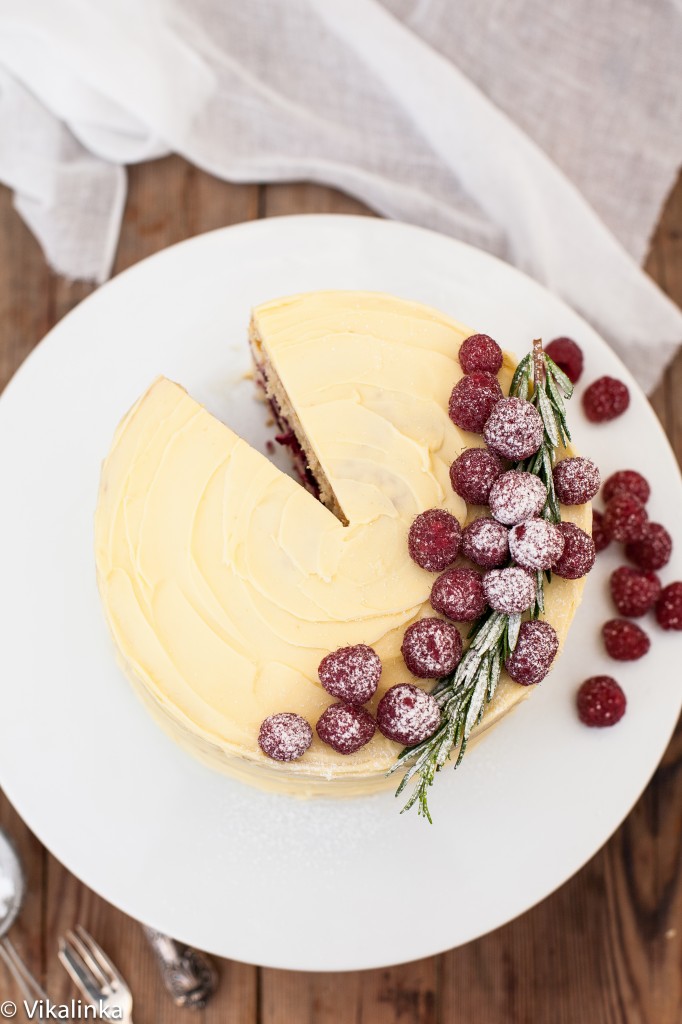
But it also has to look the part. It should not look out of place on a festive table, with all the right colours and decorations. Personally, I think a white cake with raspberries and rosemary absolutely looks the part!
What is Frostbitten Raspberry Cake?
In coming up with this cake I had to draw on my Russian roots. The cake I made was reminiscent of the ones I ate as a child, baked by my dad.
The recipe for this raspberry cake is a mix of things: the sponge is Russian “biskvit”- my dad’s recipe, the raspberry mascarpone filling was inspired by Sweetapolita.
For a bit of help in making the sponge, check out this video for White Christmas Truffle Cake. The sponge is the same and following the same method will help you achieve great results!
And finally the white chocolate buttercream frosting was my own invention, made to taste very similar to my dad’s frosting. It’s lovely and creamy without overwhelming with too much sweetness.
Because this was made for Christmas, I chose toppings that gave it a holiday look. Rosy red raspberries and a green sprig of rosemary land perfectly on the snowy white frosting. A dusting of icing sugar adds to the effect.
It all looks so wintery! But this cake isn’t only for Christmas. It’s also perfect for New Years and, with a different mix of toppings, could be used at other times of the year as well!
More holiday cake recipes
- White Christmas Truffle Cake
- Black Forest Cake
- Cranberry Christmas Cake
- Chocolate Orange Hazelnut Tart
- Christmas Chocolate Cake with Cranberries
Frostbitten Raspberry Cake
Ingredients
For the Cake
- 5 eggs, room temperature, large
- 1 cup / 200g sugar
- 2 tsp This is an affiliate link.vanilla
- 1 cup / 120g flour
For the Syrup (for soaking the sponge layers)
- 1/4 cup / 60ml raspberry liqueur
- 1/4 cup / 60ml simple syrup
For the Mascarpone Cream
- 1 cup / 250g mascarpone
- 1 cup / 250ml whipping cream
- 1/4 cup / 15g icing sugar
- 2 tsp gelatine
- 2 tbsp water
- 2 tsp This is an affiliate link.vanilla
For the Raspberry Compote
- 1 1/2 cups / 190g raspberries, fresh or frozen (I used frozen)
- 1/2 cup / 100g sugar
- 2 tbsp water
- 1 cup / 125g fresh raspberries
For the White Chocolate Buttercream
- 5 oz / 150g white chocolate, chopped (not chocolate chips)
- 1/4 cup / 60ml whipping/double cream
- 4 tbsp unsalted butter, softened
For decoration
- 1 sprig rosemary
- 1/4 cup / 30g raspberries
- Icing sugar for dusting
Instructions
For the Cake
- Preheat the oven to 350F/180C.
- Grease 3 8″ cake pans and line them with parchment paper. (Russian sponge is very delicate so it’s important to use parchment paper for easy removal.)
- Crack 5 eggs at room temperature to a bowl of a stand mixer and add sugar and vanilla, beat at high speed for 5 minutes until the mixture is pale and triples in volume.
- Fold in flour through a sifter in 5-6 additions blending it in gently after each addition. Your goal is to keep the volume of the egg mixture so be very careful in this step of the process.
- Divide your cake batter among 3 pans and bake for 25-30 minutes until cake tester or tooth pick comes out clean and the cakes have risen to the top of the pan. (I baked 2 layers and then 1 later).
- Cool for 10 minutes and then run a knife around the edges of your pans to release the cakes and flip them over on a wire rack to cool completely.
- (After your cakes have cooled you can individually wrap them in plastic wrap for later use. You can bake you sponge layers a day ahead.)
For Raspberry Compote
- Combine 1 1/2 cups of raspberries and sugar with water in a small saucepan and cook on low heat until thick and mixture coats the back of a spoon. It will take about 15 minutes.
- Remove from heat and process in a food processor or a blender until smooth.
- Push through a fine sieve to get rid of the seeds.
- Combine the compote with fresh raspberries and set aside.
For the Mascarpone Cream
- Mix gelatine with water in a small bowl. Let it sit for 5 minutes until it goes spongy.
- Heat the gelatine mixture in a microwave for 10 seconds until runny and smooth.
- Combine mascarpone, whipping cream, sugar and vanilla in a bowl of a stand mixer.
- Start whipping on medium speed until combined.
- With the motor of a stand mixer still running drizzle your gelatine mixture over the cream and whip for 2-3 minutes until well combined.
For the Syrup
- Combine raspberry liqueur with simple syrup (water and sugar mixed in equal parts).
- Drizzle over the cake layers. (Russian sponge really benefits from being drizzled with a flavoured syrup since there is no fat mixed into the batter and it can taste on the dry side without the syrup.)
How to assemble the cake
- Load your mascarpone cream in a large piping bag with a plain round tip.
- Pipe a border around the first drizzled with syrup layer, it will keep your raspberry compote from leaking out of the sides.
- Fill with half of your raspberry compote. ( It won’t cover the entire layer, the berries will be spread sparsely.)
- Then pipe in the mascarpone cream in the empty spaces and smooth it out with a spatula. You shouldn’t have any gaps.
- Top with another layer and repeat the process.
- Finish with the third layer.
For the White Chocolate Buttercream
- Heat 1/4 cream in a saucepan until it just simmers but not boiling.
- Take off the heat and pour over chopped white chocolate in a medium sized bowl.
- Let it sit for a couple of minutes and then stir until chocolate is melted into the cream.
- Cool for 10 minutes and then start whipping in a stand mixer or with a hand mixer. (Hand mixer works better here because of the small amount).
- Mix for 10 minutes until light and fluffy, then start adding softened butter by a tablespoon, mix well until entirely incorporated into the frosting after each addition. (You will have enough frosting for a thin layer around the cake. If you like more frosting on your cake simply double the recipe but it will make a very sweet cake.)
- Spread 1/2 of the buttercream over the cake and let it chill in the fridge for 20 minutes.
- Coat your chilled cake with the other half of the frosting and decorate with rosemary and raspberries.
Nutrition information is automatically calculated, so should only be used as an approximation.


My birthday is New Years Eve and this is going to be my birthday cake this year. We are working on it now. So excited!
Happy Birthday, Dawn! I hope this cake is everything you’d hoped for!!
Very easy recipe to follow. It turned out exactly as it did in the picture. I only had one 8″ cake pan so I removed the caked immediately and cooled the pan in cold water and had no trouble with the batter deflating. I made it the day before and decorated it right before serving and it turned out great. I definitely recommend increasing the frosting amount to 1.5x. This was just the right amount for me to coat in a thin even layer. I did not blend the compote and only pushed the mix through a sieve which ultimately left it thinner and made for another moistening agent. The cake turned out perfectly moist and not too rich. Overall a very good cake and not too hard. Wish I could share the pictures!
the cake turned out well. I haven’t been able to tast it yet. I only made two thick layers I barely had few tablespoons of compote though. I am confused about how many whole berries to Combine with the compote. Next time I will triple the recipe for the compote it’s a great cake really because the cake can be varied with different fillings. And the filling is heavenly. It can be used for other desserts. It would be great to use in a Buch de Noel with mini chips thrown on.
Thank you, Roseanna, I completely agree that the filling is so versatile! To answer you question, you should have more than a few tablespoons of compote. If you look in the ingredient list it says that you need 1 1/2 cups of raspberries to make the compote and then add another cup of fresh raspberries once it’s done. Also, the compote doesn’t cover the cake layers entirely. You should drop the compote in a few places and then fill the rest with mascarpone cream. The filling would be leaking out is you spread the compote over the entire layer. One of those days, I will make a video to clear up all the technical difficulties. 🙂 Have a lovely Christmas!!
Thanks for your reply on what is probably a busy day for you. I use an apple corer to take a small plug from the middle of my cakes to taste and the cake is still great tasting. I just placed a few berries atop the frosting to solve my misstep.
I made this cake for my daughter’s birthday and it was amazing! Although it’s small, it is so rich that it was more than enough for the 10 of us. We felt it could easily serve 12. I loved learning new techniques with the cake and the frosting. I did double the frosting, with the intention of using some for decoration. I did discover that you shouldn’t chill the frosting with the idea of using it later. It wouldn’t smooth out again after being in the fridge even after I let it warm up, so I couldn’t pipe it. Ah well. It was still gorgeous. For the mascarpone cream, I think it helps to have the cheese a little warmer than straight from the refrigerator. Another tip – if you don’t want to buy a whole bottle of raspberry liquor, you can get the tiny “travel” bottles in the states that are almost enough for the recipe.
Thanks for a great recipe!
Thank you so much for your feedback, Beth! If you refrigerate the frosting, let it come to a warm temp and then whip it, this way it should be nice and smooth again! 🙂
Is it safe to have kids eat this since your aren’t cooking the liquor but just mixing it with the syrup?
Stacy, feel free to skip alcohol if you are concerned, however the minuet amount that would be consumed, since it’s diluted and get spread over the entire cake, is not substantial to cause any damage.
how many days ahead can I make this cake?
I wouldn’t recommend longer than a day ahead, Elisabeth, as all baked goods this cake is best eaten fresh.
Ok, thank you. I was only thinking of making a day ahead. so excited to try it out. thanks!
Perfect, do let me know how it turns out!
After the sponge cakes are baked, how tall should they be?
Each layer is about 1 1/4″ tall.
Hi Julia, can the sponge cakes be made far in advance ? If so, how far? I was thinking of making it 3 days in advance. Thanks 🙂
If you are making them so far in advance, I would wrap them up in cling wrap and freeze them, Melissa. Otherwise these sponges get dry quickly as they are very delicate and don’t have any butter or oil in them. I hope this helps!
Hi! Are All the ingredients for the cake is listed? No baking powder/soda, butter/oil??
The cake is made only with those ingredients ?
Yes, all ingredients are listed.