This post contains affiliate links. When you purchase through our links, we may earn a commission.
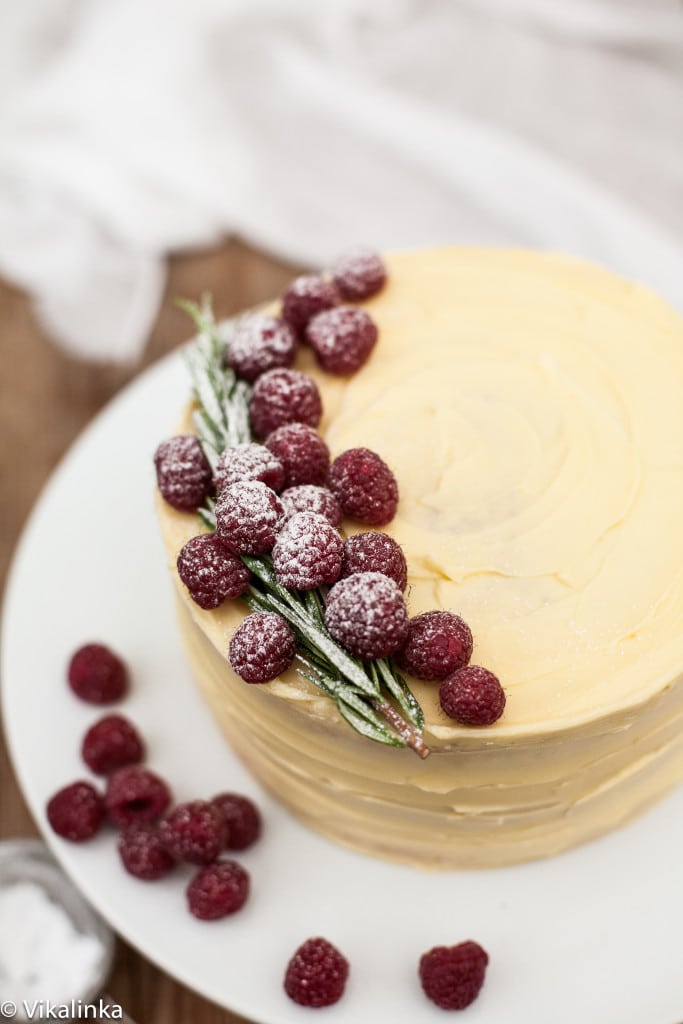
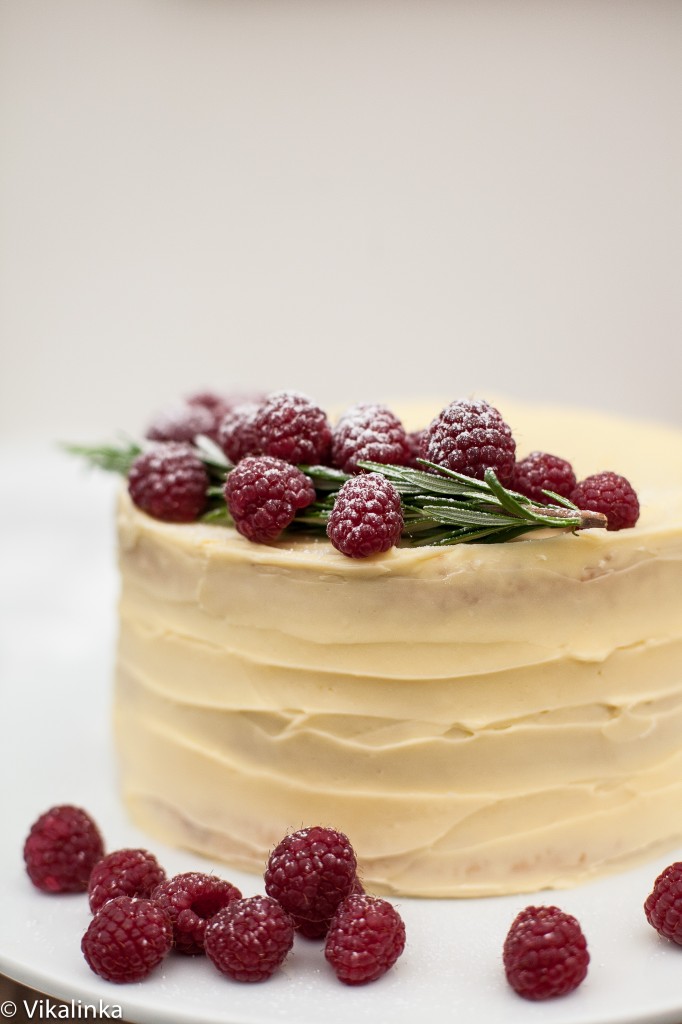
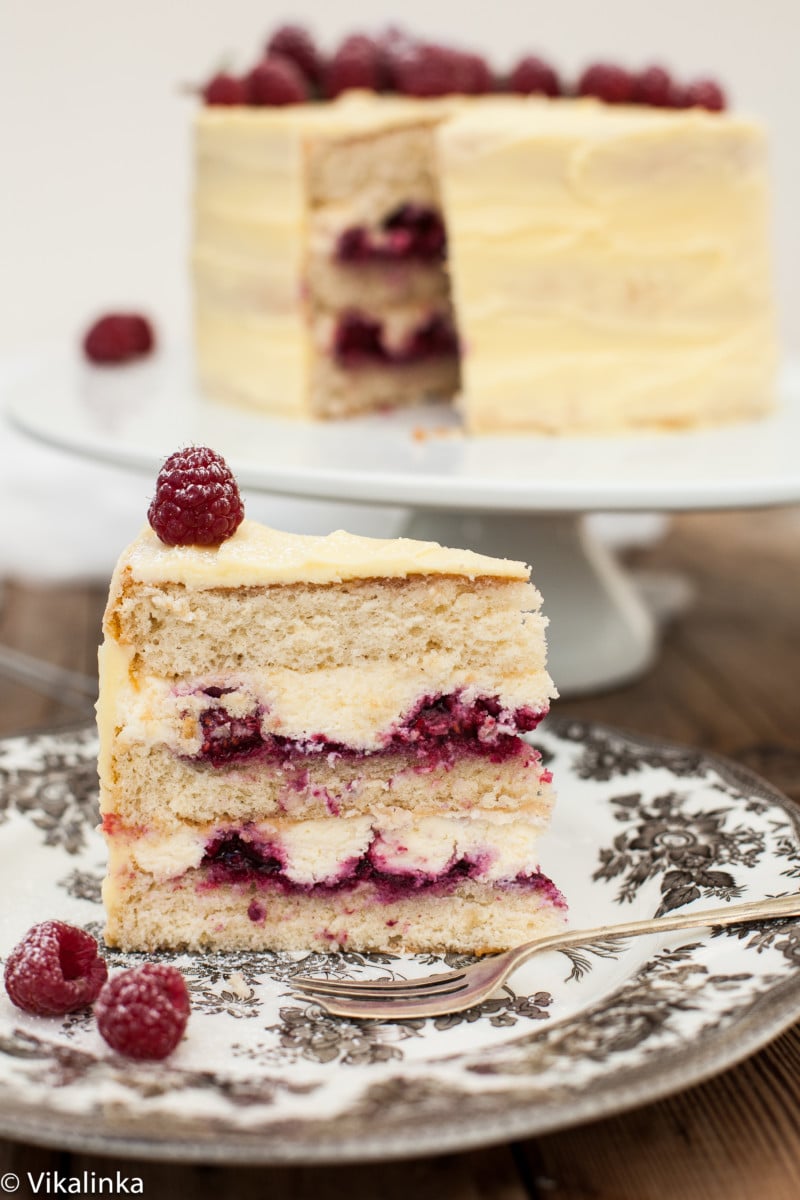
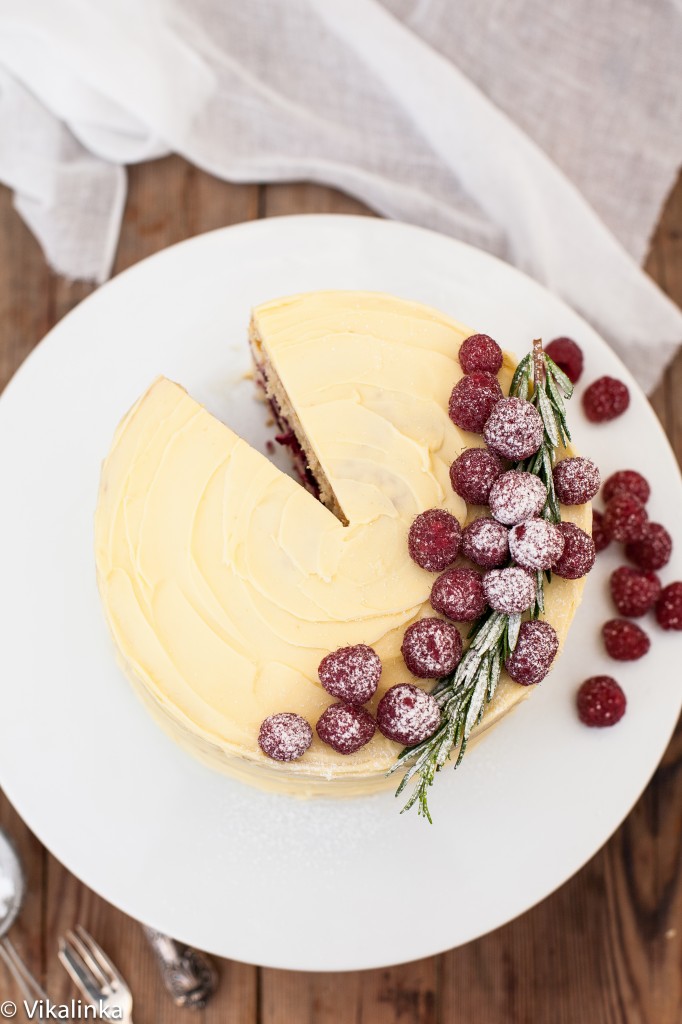
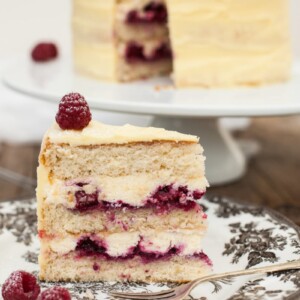
This Frostbitten raspberry cake is the cake for any celebration in any season! Three layers of vanilla sponge filled with raspberry compote and mascarpone frosting, covered in a creamy white chocolate frosting.
Find more delicious treats in our Christmas Dessert Collection!
I love all cakes I bake but some make the effort more worthwhile than others. This raspberry cake is off the scale magnificent!
I can’t even begin to describe the greatness of vanilla sponge cake filled with mascarpone and raspberry compote and frosted with white chocolate buttercream. It’s glorious.
After I took the first bite I was not at all resentful that I’d spent a good portion of Christmas Eve fussing in the kitchen. If this is what it takes for an amazing birthday cake then it is worth it!

To me a perfect cake should have at least two layers of moist sponge, a lovely compote and a luxuriously creamy icing that isn’t sickly sweet. Having these elements in perfect balance is the secret to a memorable cake.
But it also has to look the part. It should not look out of place on a festive table, with all the right colours and decorations. Personally, I think a white cake with raspberries and rosemary absolutely looks the part!
What is Frostbitten Raspberry Cake?
In coming up with this cake I had to draw on my Russian roots. The cake I made was reminiscent of the ones I ate as a child, baked by my dad.
The recipe for this raspberry cake is a mix of things: the sponge is Russian “biskvit”- my dad’s recipe, the raspberry mascarpone filling was inspired by Sweetapolita.
For a bit of help in making the sponge, check out this video for White Christmas Truffle Cake. The sponge is the same and following the same method will help you achieve great results!
And finally the white chocolate buttercream frosting was my own invention, made to taste very similar to my dad’s frosting. It’s lovely and creamy without overwhelming with too much sweetness.
Because this was made for Christmas, I chose toppings that gave it a holiday look. Rosy red raspberries and a green sprig of rosemary land perfectly on the snowy white frosting. A dusting of icing sugar adds to the effect.
It all looks so wintery! But this cake isn’t only for Christmas. It’s also perfect for New Years and, with a different mix of toppings, could be used at other times of the year as well!
More holiday cake recipes
- White Christmas Truffle Cake
- Black Forest Cake
- Cranberry Christmas Cake
- Chocolate Orange Hazelnut Tart
- Christmas Chocolate Cake with Cranberries
Frostbitten Raspberry Cake
Ingredients
For the Cake
- 5 eggs, room temperature, large
- 1 cup / 200g sugar
- 2 tsp This is an affiliate link.vanilla
- 1 cup / 120g flour
For the Syrup (for soaking the sponge layers)
- 1/4 cup / 60ml raspberry liqueur
- 1/4 cup / 60ml simple syrup
For the Mascarpone Cream
- 1 cup / 250g mascarpone
- 1 cup / 250ml whipping cream
- 1/4 cup / 15g icing sugar
- 2 tsp gelatine
- 2 tbsp water
- 2 tsp This is an affiliate link.vanilla
For the Raspberry Compote
- 1 1/2 cups / 190g raspberries, fresh or frozen (I used frozen)
- 1/2 cup / 100g sugar
- 2 tbsp water
- 1 cup / 125g fresh raspberries
For the White Chocolate Buttercream
- 5 oz / 150g white chocolate, chopped (not chocolate chips)
- 1/4 cup / 60ml whipping/double cream
- 4 tbsp unsalted butter, softened
For decoration
- 1 sprig rosemary
- 1/4 cup / 30g raspberries
- Icing sugar for dusting
Instructions
For the Cake
- Preheat the oven to 350F/180C.
- Grease 3 8″ cake pans and line them with parchment paper. (Russian sponge is very delicate so it’s important to use parchment paper for easy removal.)
- Crack 5 eggs at room temperature to a bowl of a stand mixer and add sugar and vanilla, beat at high speed for 5 minutes until the mixture is pale and triples in volume.
- Fold in flour through a sifter in 5-6 additions blending it in gently after each addition. Your goal is to keep the volume of the egg mixture so be very careful in this step of the process.
- Divide your cake batter among 3 pans and bake for 25-30 minutes until cake tester or tooth pick comes out clean and the cakes have risen to the top of the pan. (I baked 2 layers and then 1 later).
- Cool for 10 minutes and then run a knife around the edges of your pans to release the cakes and flip them over on a wire rack to cool completely.
- (After your cakes have cooled you can individually wrap them in plastic wrap for later use. You can bake you sponge layers a day ahead.)
For Raspberry Compote
- Combine 1 1/2 cups of raspberries and sugar with water in a small saucepan and cook on low heat until thick and mixture coats the back of a spoon. It will take about 15 minutes.
- Remove from heat and process in a food processor or a blender until smooth.
- Push through a fine sieve to get rid of the seeds.
- Combine the compote with fresh raspberries and set aside.
For the Mascarpone Cream
- Mix gelatine with water in a small bowl. Let it sit for 5 minutes until it goes spongy.
- Heat the gelatine mixture in a microwave for 10 seconds until runny and smooth.
- Combine mascarpone, whipping cream, sugar and vanilla in a bowl of a stand mixer.
- Start whipping on medium speed until combined.
- With the motor of a stand mixer still running drizzle your gelatine mixture over the cream and whip for 2-3 minutes until well combined.
For the Syrup
- Combine raspberry liqueur with simple syrup (water and sugar mixed in equal parts).
- Drizzle over the cake layers. (Russian sponge really benefits from being drizzled with a flavoured syrup since there is no fat mixed into the batter and it can taste on the dry side without the syrup.)
How to assemble the cake
- Load your mascarpone cream in a large piping bag with a plain round tip.
- Pipe a border around the first drizzled with syrup layer, it will keep your raspberry compote from leaking out of the sides.
- Fill with half of your raspberry compote. ( It won’t cover the entire layer, the berries will be spread sparsely.)
- Then pipe in the mascarpone cream in the empty spaces and smooth it out with a spatula. You shouldn’t have any gaps.
- Top with another layer and repeat the process.
- Finish with the third layer.
For the White Chocolate Buttercream
- Heat 1/4 cream in a saucepan until it just simmers but not boiling.
- Take off the heat and pour over chopped white chocolate in a medium sized bowl.
- Let it sit for a couple of minutes and then stir until chocolate is melted into the cream.
- Cool for 10 minutes and then start whipping in a stand mixer or with a hand mixer. (Hand mixer works better here because of the small amount).
- Mix for 10 minutes until light and fluffy, then start adding softened butter by a tablespoon, mix well until entirely incorporated into the frosting after each addition. (You will have enough frosting for a thin layer around the cake. If you like more frosting on your cake simply double the recipe but it will make a very sweet cake.)
- Spread 1/2 of the buttercream over the cake and let it chill in the fridge for 20 minutes.
- Coat your chilled cake with the other half of the frosting and decorate with rosemary and raspberries.
Nutrition information is automatically calculated, so should only be used as an approximation.


Do u think using black raspberry liquer instead would taste good ?
Absolutely, Stephanie!
Also, I would recommend to read all the comments hahaha so you can learn from others mistakes (≧∇≦)
Hi! I had this love-hate relationship with this cake. At first I couldn’t prepare the cake per se properly, it came out as flat as pita bread LOL. The next day I gave it a second chance because I saw what I was doing wrong and I learnt from my mistakes. The result: an amazing cake in which you really need to pay attention to the instructions or it will come out as a great failure. My advice? Stick to the recipe and you will have an amazing cake!! (*^^*)
Great advice, Ale, thank you for sharing!! And way to persevere and overcome! 🙂
I was stunned by the beauty of this cake when I found this recipe. I made a similar cake. For the pound cake I whipped the egg mixture and then folded in the sifted flour with a spatula by hand. The cake still came out a little dense but it was probably from my end. I did not have raspberry liqueur so I used Amaretto (almond liqueur) and it wasn’t too strong. More of a subtle flavor enhancer. I made the raspberry compote and cooked it down with less sugar. I also put less sugar in the mascarpone filling. Overall it came out great! Wish I could post a picture some how. Thanks for the great recipe
That’s so great to hear. Also, pound cake is always dense so don’t blame yourself, Sierra.
Hi Vikalinka,
I would like to make this cake for a baby shower, but was wondering what I could use instead of Raspberry liqueur? I need something without alcohol so the mother to be can enjoy it! Any suggestions welcome! I’m very excited to make this and can’t wait for everyone to try it!
You can use simple syrup with some vanilla added for flavour, Alexa.
The cake looks absolutely scrumptious! I’m not a baker, all I can make is a pound cake. I don’t own a stand mixer, and with the amount of baking I do, it doesn’t make sense for me to buy one. Is electric hand mixer okay to use? Since you mention mixing everything in stand mixer so much, I thought maybe it changes the texture, depending on mixers :/ Does it?
You can absolutely use your hand mixer, Afifa, just make sure you mix the batter for the amount of time stated until it triples in volume. It takes a while using a hand mixer but it is definitely possible. Good luck!
I also made this cake for my own birthday. It took a while but it was worth it – it’s a really luxurious cake. It tastes a little like raspberry trifle but it’s not soggy or damp. Fantastic recipe. the whole cake was gone in a day! Thankyou.
I am so pleased to hear you enjoyed it, Kim! Happy belated birthday!
Hello!
I’m wondering if the batter would hold up I’m the refrigerator as I only have one 8″ pan to bake the cake.
Hi Kelsie, I haven’t tried but I wouldn’t recommend refrigerating it. I think it might work but I would just leave it out on the counter. Can you perhaps borrow another pan from a friend?
Hi there! I’m so excited about this cake.I bought all the ingredients and was planning on baking it tomorrow ( Christmas eve). However, since I only had a 9′ pan I decided to start tonight with the cake part. The first layer came out a little more golden brown than I expected and was kind of crunchy looking. I baked the other two less time respectively. But they don’t look spongy or soft like your photos. I live in Denver, maybe the altitude? Do you have any suggestions? I’m willing to start from scratch, but I could always use what I got, I’m sure it’d still taste pretty good even if the texture is off.
Thanks for your help!
Hi Dafne, hmmm…first of all, if you are using an 9″ pan I would only do 2 layers and not 3, they were probably too thin to start with and dried out too much. Another thing to watch for is your oven temperature. I never trust my oven temp and have an oven thermometer I purchased and placed inside to make sure the temp is what it’s supposed to be. You’d be surprised by the difference…mine is off by 20 degrees! Lastly, do make sure you whip your eggs and sugar until they triple in volume, sometimes it can take up to 8-10 minutes depending on the power of your mixer. The sponge is pillowy soft when it first comes out of the oven, it shouldn’t be crunchy at all. I hope this helps. Please, let me know how you get on! Merry Christmas!
Thanks for replying! The cake turned out delicious and it was a great success. I realized about not having the right pans when it was too late and I did not have time to run to the store. So I went ahead and used what I had. I figured that the texture might not be what your cake was meant to be but at least it would still be delicious. The fact that you have a syrup to moisten the cake helped mine tremendously.
So thanks again!