This post contains affiliate links. When you purchase through our links, we may earn a commission.
Everyone NEEDS an overnight, no knead farmhouse bread recipe in their arsenal because it’s just that easy and you can’t beat the aroma of freshly baked bread in your house!
For a quicker no knead bread recipe, check out my Dutch Oven Bread.

For years bread making has been my Everest. Always admired but never conquered. I am a pretty good baker and I make all kinds of baked goods, as you know if you follow me, but for some reason working with yeast has always scared me.
I come from a long dynasty of bread makers. Every woman in my family has made her own bread…except for me.
By nature I am an overcomer; I can’t bare the fact that there is a skill I don’t possess. It seriously drives me crazy. For example, I can only drive a car with an automatic transmission. Just not cool. It’s on my to-do list.
I’ve had some practice of baking with yeast through pizza dough making, which is no different from bread so I figured it’s time to overcome my fear and get right down to it.

Although this is a simple recipe and method, I did spend some time to practice and get it just right. I’ve made this no-knead bread a lot over the last weeks, which has brought nothing but happiness to my household.
A few tweaks along the way, and I think this recipe is pretty much perfect. Give yourself some time to practice as well. In no time you’ll be an expert as well!

How to make no knead bread
The first recipe for this miracle bread is no secret. It was revealed by The New York Times in 2006 and has been all over the blogosphere ever since and for a very good reason.
The author Jim Lahey claimed a 6 year old could make a European bakery style bread, a claim tested by many and agreed upon. I figured it would be a good recipe to start with.
As the title suggests, this particular bread recipe requires no kneading, the integral part in successful bread making. Instead of kneading the bread dough, this recipe utilises a long, 12-hour fermentation time to develop gluten.
Not only does it achieve the same result as kneading, it also develops much better bread flavour. You will be quite surprised if you have a side by side taste test with a grocery store loaf. Your homemade bread will be miles ahead in terms of flavour and texture.

How it’s different
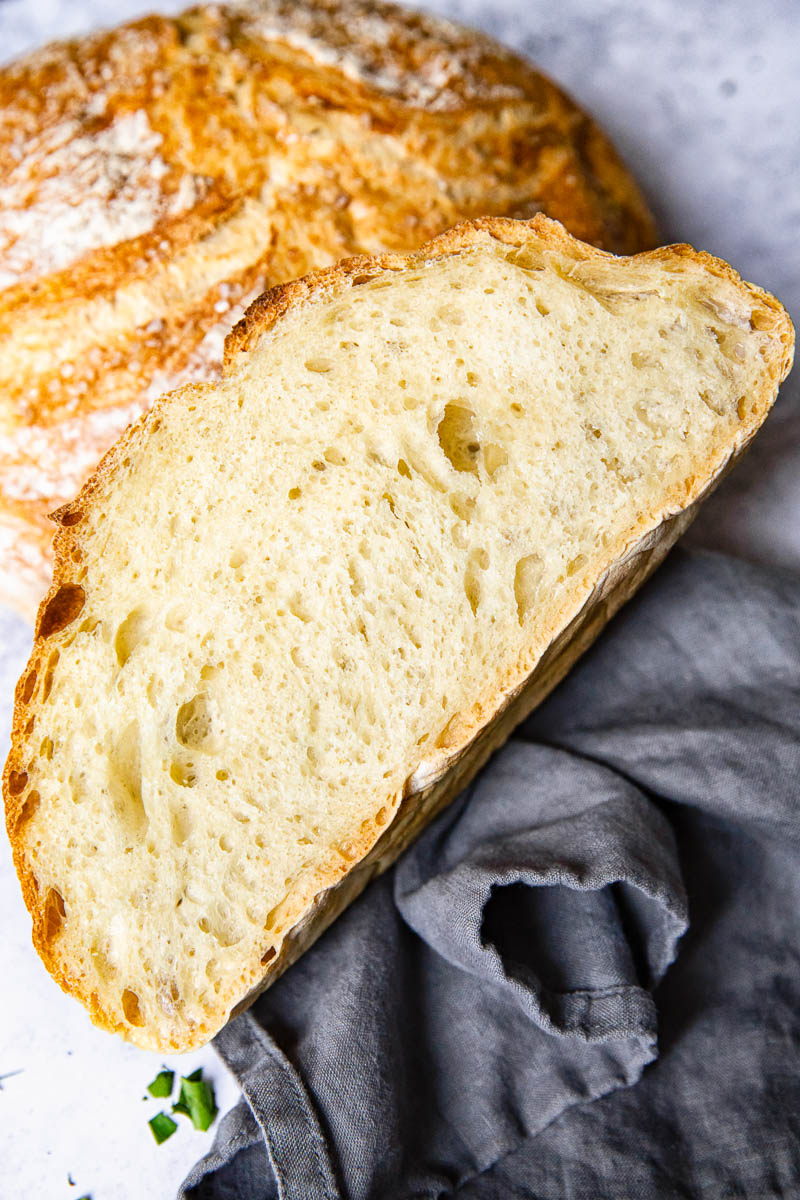
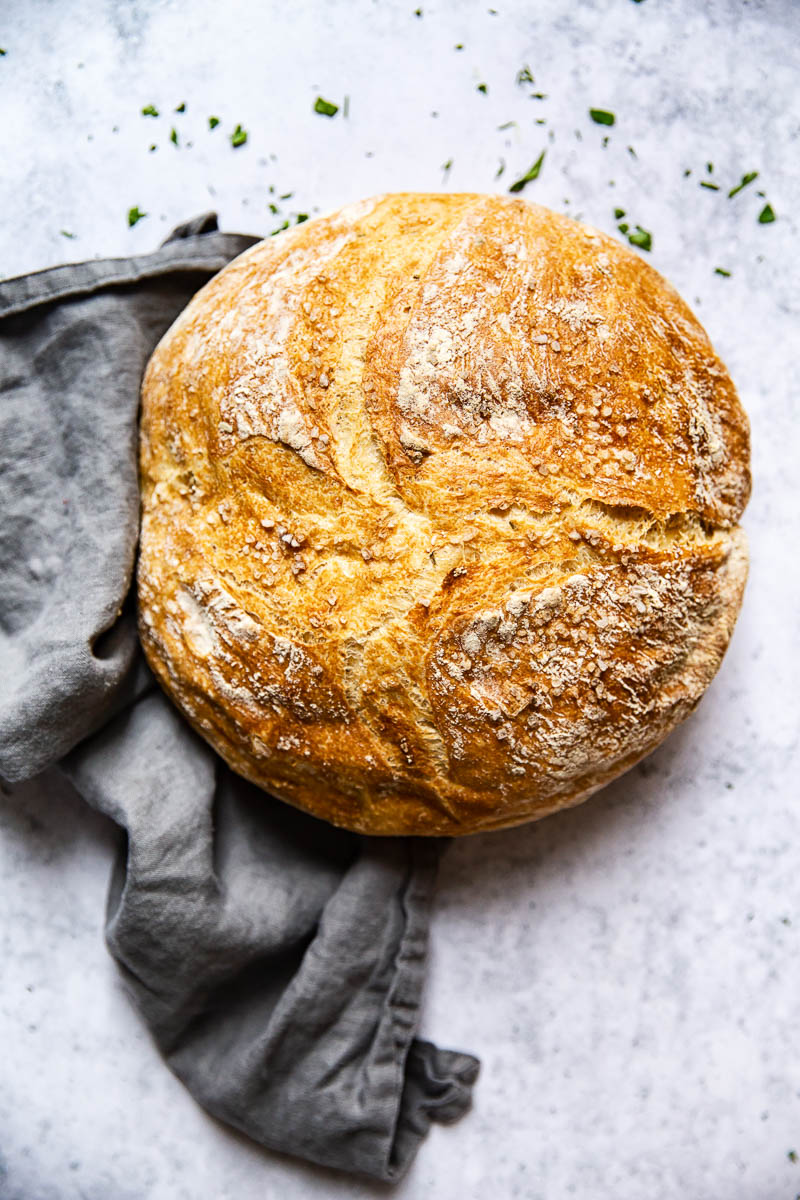
The best part for me personally is the thick and chewy crust that is the hallmark of any good European loaf. Unfortunately, in North America it’s not as easy as it should be to get bread with this sort of crust outside of an overpriced bakery.
This particular recipe reminded me of Pain de Campagne, a traditional French sourdough country bread that I buy as often as I can.
You might ask what sets this recipe apart from every other recipe out there. The main difference is the method of baking.
The magic comes when it’s baked in a blazing hot oven inside a preheated This is an affiliate link.Dutch oven with a lid on which does 2 things: it concentrates moisture (and therefore a thick, chewy crust), and allows the bread to rise quickly.
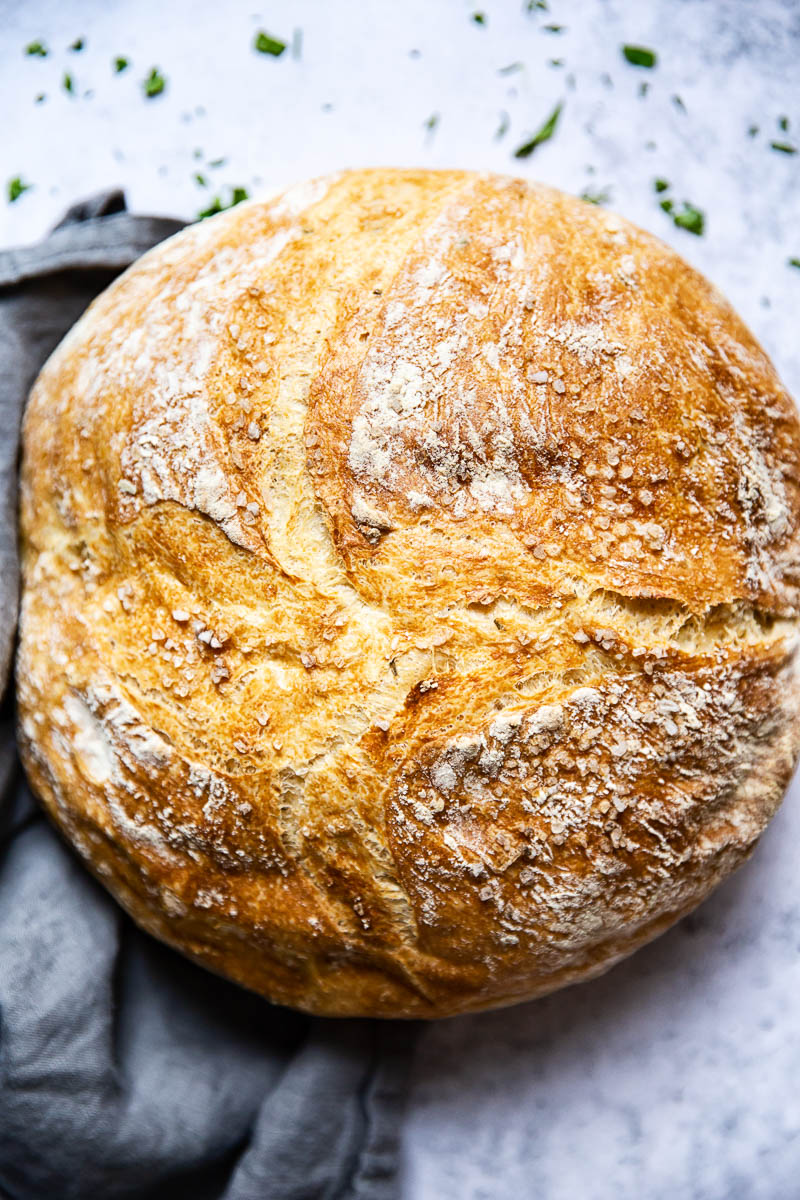
Can you just take a look at that loaf?! How can you not fall in love immediately! And that smell of a freshly baked loaf!

Recipe Tips and Notes
- Bread benefits from time for the dough to rise, but some days you may not have the time to wait. In that case, try my quicker version of Dutch Oven Bread. Still lovely and fluffy inside with a chewy crust, but with the rising time cut to 2 hours!
- I’ve used all white flour for my bread, but it’s a simple recipe that is easily adaptable. Use a portion of whole wheat flour if you would like to adapt the loaf, keeping the total amount of flour the same.
- All purpose flour will work, but bread flour will be a better choice. The difference is a higher amount of protein in the bread flour that creates more chew and structure in the loaf. You are likely to need to add a bit extra if using all purpose flour. If your dough seems a bit runny and doesn’t hold it’s shape, add some and mix it in as well as you can.
- Remember that dough will rise quicker or slower depending on the room temperature. 12 hours is a good average, but it may be different for you if your room is a bit colder or warmer.
- When it’s time to let the dough rise, give it a sprinkling of flour and cover with a kitchen towel. The flour is there so the cotton towel doesn’t stick.
- To limit mess and make the transfer of your dough easier, you can place your shaped dough on a piece of parchment paper, then pick it up by the opposite side of the paper and lower it into the Dutch Oven. That said, I don’t use parchment paper and my bread never sticks.
- Whether you use parchment paper or not, be sure to leave the dough to rise on a well floured work surface. This prevents the dough from sticking, which you’ll be grateful for later.
- I had a lot more success with baking bread once I started using an This is an affiliate link.oven thermometer. Oven temperatures can vary widely, so using one to check yours will make sure that you aren’t baking on a cooler or warmer temperature than you think.
- You are in control of baking times. If it looks like the crust should be a bit darker, leave it in the oven for 10-15 minutes longer.
- The bread can be easily adapted in all sorts of ways. One is to add seeds like sesame seeds or poppyseeds to the top of the dough before baking.

Serving suggestions
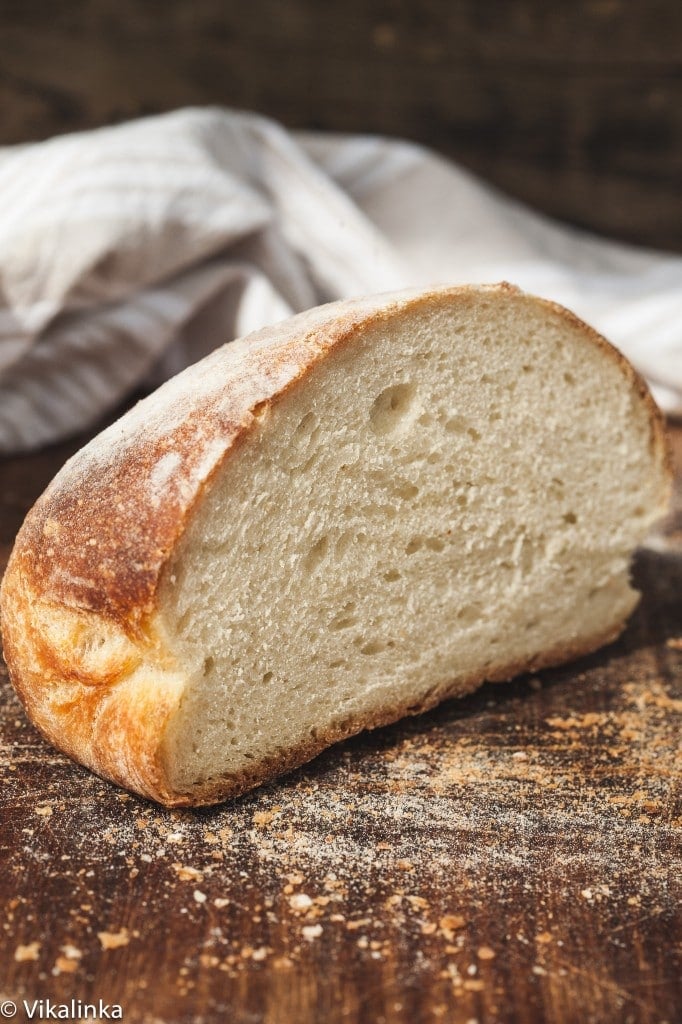
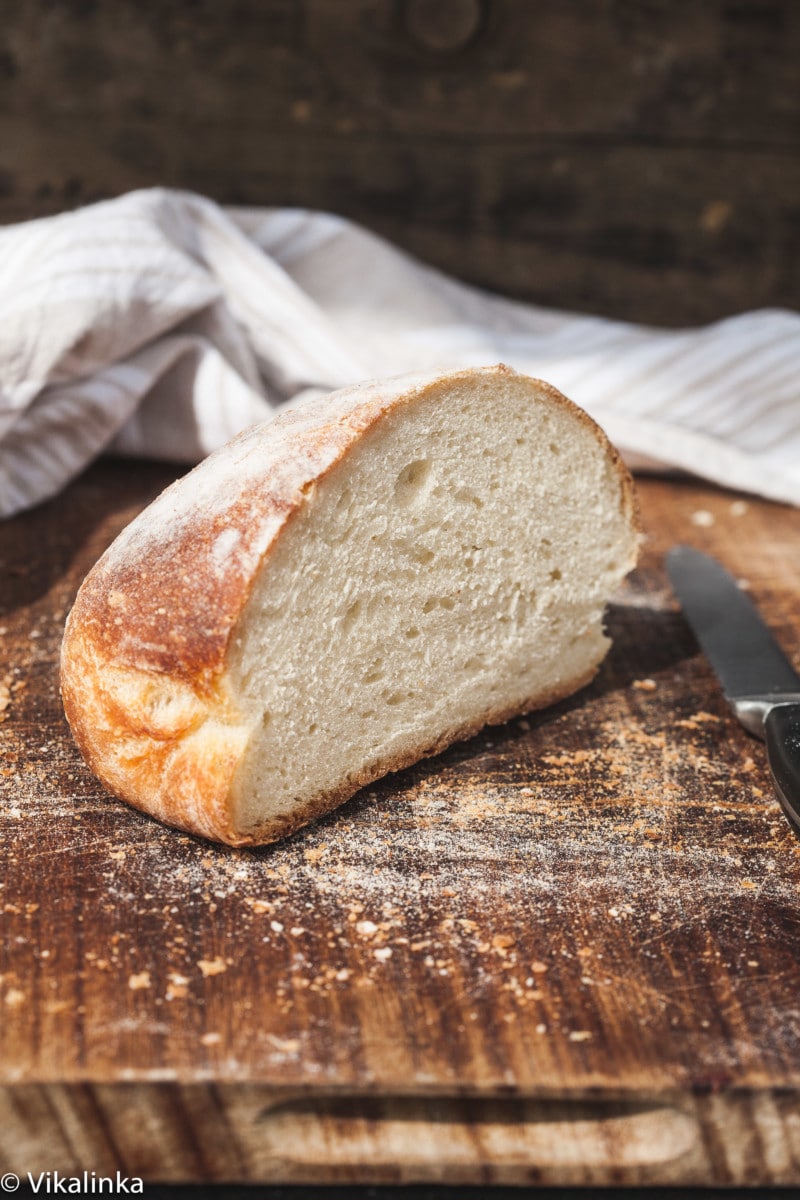
As tempting as it is to gorge on bread when it is steaming hot and straight from the Dutch oven, it’s actually better to give it time to cool. Cutting it open too soon lets a lot of the steam escape, leading to tougher, less tender bread that dries out much faster.
Instead, leave it on a wire rack so air can circulate, and let it come to room temperature before slicing open. Or something close to room temperature – I can never manage to wait quite that long!
Your patience won’t be regretted. Slather the bread in butter, a slice of cheese or turn it into a tasty sandwich. Perfection!
Storage and leftovers
If you don’t plan to use the bread within a couple of days, or you made an extra loaf or two, the best place to store it is the freezer. Keep it sealed in plastic wrap or something similar and use within 3 months.
More bread recipes
- Easy Flatbread
- Rosemary Spelt Bread Recipe
- Rhubarb and Red Currant Jam Swirled Bread
- Sourdough Bread
No Knead Farmhouse Bread

Equipment
- This is an affiliate link.Cast iron Dutch oven
- This is an affiliate link.Oven thermometer
Ingredients
- 3 to 3 1/2 cups/400g to 450 g all-purpose or bread flour, more for dusting (I used 3 1/2 cups)
- ¼ tsp This is an affiliate link.instant yeast
- 1¼ tsp salt
- 1 1/2 cups/ 375ml warm water
- Flour for dusting
Instructions
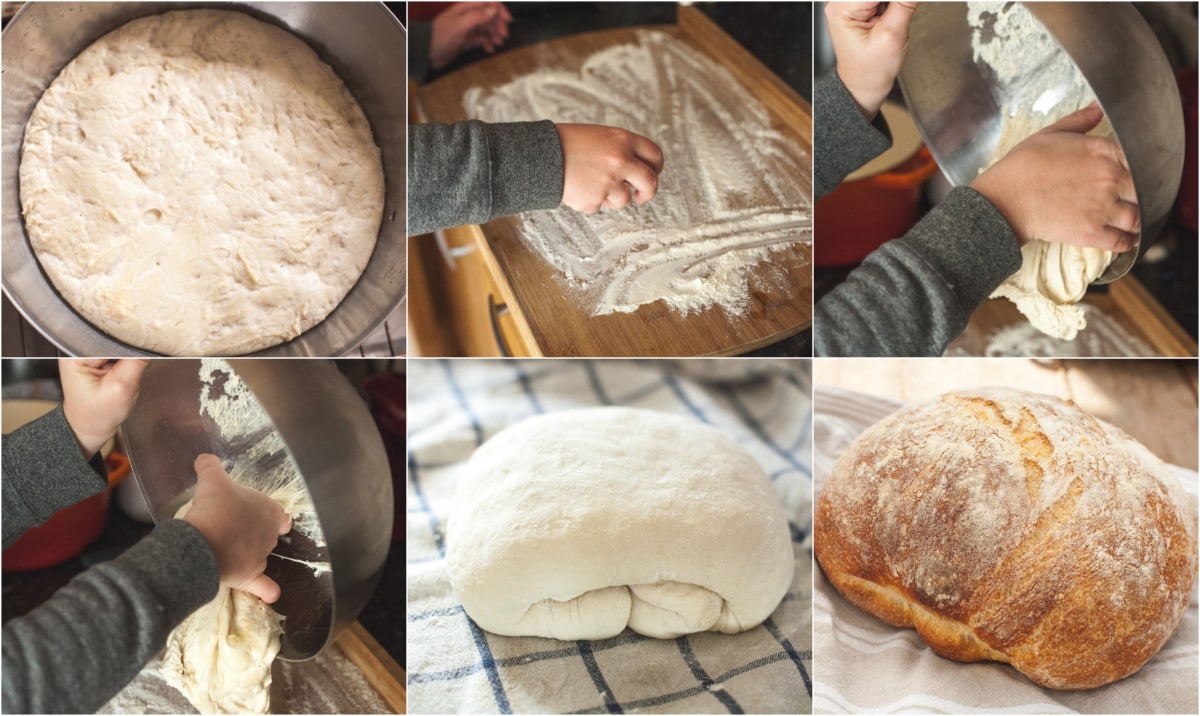
- Mix flour, yeast and salt in a large bowl. Add warm water to the ingredients and mix until a sticky dough forms. Cover with a towel and let it rise on the counter for 12 hours.
- Preheat the oven to 500F/260C with Dutch oven inside.
- Turn your dough out on a floured surface, it will be flat, tuck all four sides in to form a ball and place it on a floured surface seam side down, sprinkle with more flour and cover with a towel. Don't be afraid to be generous with flour. Let it rise for 20 minutes.
- If you are short on time you can bake your bread after a 20 minute rise, and it will be a somewhat dense and hefty loaf yet still delicious. (Like mine in the pictures). Alternatively, you can let it rise for 2 more hours in order to produce a more airy loaf of bread.
- Cut slits in the top of the loaf with a sharp knife approximately 1-2cm deep to allow steam to escape and create a better shaped loaf.
- Take Dutch oven out of the oven and carefully place your dough in it, cover with a lid and bake for 25 minutes.
- Take the lid off and bake for 10-15 minutes longer to get more colour into your crust.
Notes
Nutrition
Nutrition information is automatically calculated, so should only be used as an approximation.


never had such a high rise with a quarter tsp yeast.
Hi! Thank you for the recipe!
How big the dutch oven should be for the resulted dough quantity? Sorry if I missed these info, but I read a couple of times without finding them.
Thanks!
The Dutch Oven I use is 5.3 litre/4.6 quart capacity.
I made your recipe this weekend and it turned out better than I expected. Crunchy outside and fluffy and airy on the inside. I shared your recipe with several friends and hope they enjoy it as much as I do. I will definitely make it again. I made a sandwich composed of thin slices of brie cheese and apples, fresh baby spinach, and apricot jam instead of butter or mayonnaise. Then I toasted it for a few minutes. Great combination on my homemade bread!
Hi, I’m really looking forward to trying your recipe tonight, looks great! I’ve noticed on other bread recipe that melted butter is used in the dough, why is there no oil or butter used in this recipe? What do you think would happen if I replaced some of the water amount with melted butter instead- would it still work? Or should I just stick the the recipe as it is?
Thanks in advance!
Hi Hannah, using flour, yeast, water and salt is the most traditional method of making bread. Adding oil, melted butter and sometimes eggs is what is known as enriched dough and is usually used for buns, pastries and brioche. I wouldn’t change the recipe as the proportions will be thrown off and I can’t guarantee it will turn out.
This is the most successful bread recipe I have made. It is delicious. I don’t have Dutch oven I used a Crock-Pot with a lid and oiled the sides with rice oil. Thank you so much for this recipe.
Thank you for your lovely feedback, Celia!
Have you ever tried to make it with whole wheat?
Yes, I have, Suzy. It works just as well but produces a somewhat denser loaf although that might be the type of flour we buy, coarse and organic.
La masa me quedo demasiado pegajosa después de las 12 horas de levado, no la puedo tocar porque queda pegada en mis dedos, puse exactamente los ingredientes de la receta, será demasiada agua? Help me !!!
This dough is wet and sticky but it will work. It should be shaped on a floured surface. That additional flour also helps. Scroll through comments and you will see that you are not the fist one to make this or to ask this question. 🙂
I added the larger amount of flour, but the dough was way too wet. and let it rise Also not enough salt. It will be fine for garlic bread, but I’d definitely make some big adjustments next time.
Meant to say also let it rise the extra two hours.
this recipe produced really good, light, tasty bread ( I cut the salt by 1/4 teaspoon , otherwise followed as written), much better than anything I’ve made before with kneading
Great recipe and very easy.
Perfect! I am glad you found it easy, Wendy!
Turns out perfect
Thanks so much for your feedback, Jackie!
well I did it but dough sat out 20 hours started to early in day ,,,fell asleep waiting for those 12 hours it was 11 PM so finished it in morning 450 40 minutes was a tasty crusty bread airy but way to moist never tasted anything like that really an experience will try a gain but not let it ,the dough for 20 hours and make less moist by adding more flour Ill know by the feel and repost results oh and I used a cast iron skillet no cover following spelt bread cooking method
Do you mean the bread dough was moist or the baked bread, Joseph? This particular bread dough is in fact quite wet but it’s supposed to be this way.
the interior of the bread was way to moist like as if sprayed lightly with water
hello again been a long time but tryin again last time bread interior was so damp almost wet. so at 10 Am after 12 hours its goin in oven highest temp I can get is 450f Hope it comes out think Ill go an extra 15 min or so seeing as temp not as high as yours. should build a bread oven outside ???? oh using 00 Italian flour !
Using good quality bread flour really does make a difference. I don’t use 00 Italian flour for bread, only for pasta but I do buy as good quality as I can find. I find that flour affects the results more than anything.
semolina flour for bred Caputo has both oo worked out great but I did use half teaspoon plus instant yeast. and baked till top split a bit. SpliaBit extra 15 min at 450f GREAT. Now were are BAKING BREAD. GO Girl oh did use open iron skillet and a steamer oven Wolfgang Puck. really came out great another one goin in tomorrow
Great news, Joseph!! 🙂
Just made this for the first time and it was amazing! My husband is Dutch and loves nothing more than bread and cheese, this loaf lived up to our/his expectations. If I were to add kalamtaa olives for an olive loaf, when would be the best point to add them to the dough? Thanks again for helping me to rock bread baking!
So glad you loved the recipe, Lisa! I would add the olives at the very end of the mixing process, so they are well incorporated but not mashed up.
If I add a little sugar, say 1 T, will that adversely effect the outcome. I’m thinking that the sugar should help the yeast to multiply and create a larger loaf.
I haven’t tried adding sugar mostly because I don’t like sweet bread but do let me know how it goes, Jim!
I love this bread. However, I cant get it to turn brown when I toast it. Any reason for this?
Hi Doreen, I am really stumped by that. I’ve never had an issue with toasting this bread. It works every time.
There should be a sixth star. I made this today and it’s beyond simple and delicious. My toddler was fascinated by the second rise and bake portion. A couple questions, have you tried this with whole what flour? Can the batch be doubled? I have a Dutch oven and a large stock pot, both enameled cast iron and I’d love to make two loaves at a time.
Hi Jessica, I am always happy when people are successful with this recipe. To answer your question… yes, we have tried it with wholewheat flour. Wholewheat bread is what we’ve been baking for the last month and it works great. It doesn’t rise as much as white flour loaves but it’s the nature of wholewheat flour…it’s heavier and coarser. You can also double the recipe. We usually bake two loaves every Sunday but we bake them separately.
This was the first ever bread I made and it turned out incredible! Being from Latvia, breadmaking is something all the women in our families know how to do so I felt it was about time I took the plunge too!
I put chopped rosemary in the dough and let the flavour soak into it during the rise. About 10 minutes before I took it out of the oven I brushed it with sesame seed oil and sprinkled sesame seeds over it. Two flavours which you wouldn’t normally put together but it tastes so good!
Thank you so much for making my first ever bread experience so effortless and satisfying with this fabulous recipe! I’ll be visiting your page a lot for future recipes!
I am beyond happy that you found my instructions helpful and easy to follow, Marta! Bread making is so much fun and quite addicting! 🙂
Can you use a cast iron Dutch oven that isn’t coated to bake in?
Hi Cathy, yes you can. You can line it with parchment paper if you wish to prevent sticking.
Your loaf looks amazing. I have tried similar no lnead recipes and the dough is so wet it doesn’t hold its shape when rising on the parchment paper and I have to scrape it into my Dutch oven. What am I doing wrong. I follow the recipes to a tee. Thanks in advance.
The shape will always shift while it is resting. It’s okay to do a bit of reshaping before sending it to the Dutch oven, and make sure to use plenty of flour to keep it from sticking. But if it seems that the dough is a bit too wet, feel free to add more flour until it is a consistency that is right. I’ve found that bread baking requires some adjusting depending on the flour, humidity in the air and oven used, so you may want to experiment a bit to get everything right for you. Takes a bit of work but worth it!
Just made the dough. First attempt with yeast. But just noticed that my gas oven only has a setting of up to 450- will it still work? And what shelf do I put the rack on?
450F will still work. I usually put the rack on the lower shelf, so the pot is right in the center of the oven.
I made it, my daughter, sister and I loved it😊 We thought it was a little too hard though, but this was my first time to ever make bread so I will just watch it as it approaches end of the baking time and maybe cut it short by a few moments. It worked great at selling the oven at 450, As my oven doesn’t go up to 500. We all thought though that it needed a little more flavor, I usually love plain bread even without butter, so I think I’ll try it again tonight and maybe add a little rosemary and thyme to it but any feedback from you would be greatly appreciated thank you so much, Abby , I read in one of your comments that you should add seasoning at the second rise. Won’t it be harder to thoroughly mix in the seasonings if you’re doing this by hand? I am wondering why you don’t add the seasonings to the flour mixture before you read the water, but I am a novice to all of us so I have no idea…
Hi Abby, the reason I suggested the second rise because the original commenter asked about also adding garlic and I thought the smell would be overwhelming if you let it rise for 12 hours with garlic in it. If you are adding rosemary, you can surely add everything at the same time. I am so happy to hear all of you enjoyed your homemade bread. My husband is now the main bread baker in the family and a couple of years ago he never held yeast in his hands! Enjoy!!
A volunteer meeting at a friend’s house had the host making spaghetti for everyone. I made this loaf and brought it. Not until after eating it, did I mention that it was homemade. The host assumed I purchased it from a store! LOL It is impressive and delish.
I love that you were able to impress your friends with a delicious homemade loaf, Lisa!
How long do you pre heat the dutch oven for?? I can’t wait to make this!! Thank you!
Hi Amanda, I usually put it in the oven when I turn it on and take it out when the oven is the right temperature and the dough has risen enough and is ready to be baked. It just has to be hot, so I am sure 10 minutes is enough.
Just to let the gluten free people know THIS RECIPE WORKS WITH GF FLOURS. I used 1c cup4cup brand wholesome gf flour , 1c Pamala’s gf all purp flour, 1c cup4cup gf all purp flour. I used 1tsp yeast . Following all the rest of the instructions & HOLY COW I made a fabulously amazing “real” tasting bread. Brought one fresh from the oven to work & it was gone in 15 mins. No one knew in was GF . I win when the “regulars” can’t tell.
That is absolutely amazing, Aimee! Thanks so much for letting me know! One of my best friends is coeliac and I would love to make it for her. Best, Julia
Hi and thank you for this wonderful recipe my kids love it and so do I… I made it quite a few times… Tonight I prepared dough for two loafs but for some reason I put less salt.. Instead of 1 1/4 tspn I put 1/4….urgggg lol… Can I add more salt after it has risen when I take it out of the bowl to prepare it for the second rise?????
Thanks in advance
Vicky
Hi Vicky, sorry this is late but I am in a different timezone, so was sleeping! The quick answer is Yes. The only challenge with that method is making sure the salt is distributed evenly. Let me know what you ended up doing and how it turned out! Best, Julia
I do not have a dutch oven. I DO however jave a crockpot. Can I use the glass dish from that and cover it with foil instead?? I would really love to tey this bread recipe…Thanks!
Hi Laurie, I would be nervous about putting a glass dish in an oven at such high temperature, also you really need a heavy lid for it to work. I have another post where I suggest a different method of baking, which produces the same crust. https://vikalinka.com/2015/03/14/rosemary-spelt-bloomer/
The recipe says let set on counter for 12-20hours is it hours or minutes???
Hours, it’s an overnight recipe.
I don’t have a dutch oven, is there something else i can use?
Christine, you can try to use the method described here, no dutch oven needed.https://vikalinka.com/2015/03/14/rosemary-spelt-bloomer/
Just came upon yout post on 9/2016
I was helping Mom with our 3 family loaves before i started to school ( once i could count to 10, I got to measure i. The flour. As i grew i was given more to do until i did the bread all by myself
Mom could always tell if i was mad at my older siblings by how fine the loaves were. Kneading is not mysterious. The finer grain you want the more you pound, pummel, turn or beat the bread
I would hazard a guess you are following a recipe to knead a few minutes until it accepts no more flour. Just keep going longer. Best of luck
Would you believe I couldn’t wait for an answer so I wrapped my pyrex dish in tented aluminum foil, kind of like a turkey!. I made sure there was enough space between the top of the dough and the foil for it to rise. It wasn’t very pretty but it worked!
Well done, Shannon! Way to be inventive and resourceful!! 🙂
Go to yard sales. I got one of my dutch ovens CHEAP, If theyre rusty, just reseason them.
Hi! I would love to try this but I have neither a Dutch oven nor a cover for my Pyrex dish. Is there a way to improvise on the cover?
Hi Shannon, I am afraid I can’t offer any good advice. This recipe does need a tight fitting lid. Maybe you can borrow from a friend and see if you like it. I love my dutch oven, it’s a worthy investment.
Can I use active dry yeast instead?
Yes, Angela, the only difference is that active dry yeast has to be dissolved in water first before being mixed with flour.
This was. My question too. Would there be a for the measure for using the alternate yeast?
Hi there! First time I’ve ever posted anything. The picture of the farm house bread looks fabulous! I too am so afraid to bake bread as I love to bake anything but with yeast. I must get over my fear ! The recipe looks easy but what I’m confused about is, the wait of “12-20hours” is it really that long or is that a typo?
I would really like to try this!
Thank you
Maria
Hi Maria, it’s not a typo. 12 hours is how long it takes for this bread dough to fully develop. It is also pretty forgiving so if you don’t have the time to bake it after 12 hours it can wait in the fridge up to 20 hours. Hope this helps!
Hi. Your bread is so impressive. Can I mix dough at Step 2 with a kitchen-Aid hook or it Will be too much?
Thank you.
Thank you, Johanne, you absolutely can, I do sometimes when I don’t want to get my hands “dirty”, but the quality of the bread doesn’t really improve from kneading, that’s the beauty of this recipe-it’s “no-knead”. 🙂
Wow! I felt like you were speaking my thoughts! I too love to bake, but have a fear of yeast. Thanks for sharing, it lets me know I’m not the only one.
What size Dutch oven do you use? I will use my casserole dish, but would love to buy a Dutch oven.
Amy, I have 2 of them-a 3 litre and a 5 litre ones but they are not Le Creuset. I couldn’t afford spending that much money. I bought a small one from Ikea and a large one from Sainsbury’s. In my opinion they are just as good for a fraction of the price of Le Creuset.
I completely agree! I am trying to save money by baking bread and buying an expensive Dutch oven would counteract my savings. Thank you so much for your time and feedback! I am hoping to make this today with my 5 kiddos.
I bake bread all the time , but Im not sure of the directions on here ,, after the last rise on a floured towel
will it deflate when I pick it up to put it in the hot such oven ??
hot DUCH oven miss type above
Shellie, the bread won’t deflate in the hot oven. You can read comments above from other people who made the bread. This recipe has been around for a while and has been developed by a very talented and accomplished baker. Since then it’s been tested by thousands. Have no fear. 🙂
I made this today and my family loved it!
I was a little skeptical with the yeast, as I live in a city that is located at the sea level, and from what I know you must double the amount of yeast for the bread to rise properly. The truth is, I used more because I was afraid my bread wouldn’t rise. Still, the bread came out really beautiful! But I could not get the nice golden crust you had. I’ll keep trying anyway :D. Take care!. Greetings from Veracruz, Mexico! 😀
So great to hear, Mafer. To get the golden crust just keep it in the oven for 5 minutes longer next time.
I ran into an issue and was wondering if you could help diagnose what went wrong? I let it rise for about 19 hours and went to take it out of the bowl and the top had a slight crust on it and the rest was very gummy and really hard to work with. Is this normal? I’m not sure what went wrong…
Yes, it’s pretty normal, Kimberly. In order to prevent crust from forming, cover it with a plastic wrap next time. It will still be fine when it bakes. 🙂
Dear Vikalinka, can you please send me the recipe for the bread NO NEDING but the fast one that I can make at the same day. Please email me if that’s ok with you. Thank you & ill be waiting for that so I can start my bread. 🙂
Hi Selva, here is the link to the recipe. Enjoy!https://vikalinka.com/2014/05/10/no-time-no-knead-bread-with-dukkah-spice-dip/
Fantastic bread! I mad it yesterday everyone loved it! Thank you ! Today I’m making another one , the faster one!:)
You are very welcome, Selva! So happy to hear you loved it. 🙂
Dear Vikalinka, I made the bread the one that was rising for 20 hours. Everyone love that ! Thank you so much for shearing ! I’m going to make today another one that is faster it looks delicious!
I have been making bread for many years and was very skeptical about this recipe throughout. Only 1/4 tsp yeast? I let it sit for about 24 hrs at first, then 2 more for second rise. There was only a small rise(like you said it would be flat) .I sprayed a terracotta pot with pam and put it in the oven afraid that it might break but ok if it did(silly). The pam started to burn so I took it out and preheated a pyrex dish to 500. Pam burned in that pan as well, but I wiped it out and put the dough in. Nice rise in the covered dish in the oven and I had to remove it at 28 minutes because it was getting pretty brown on the bottom and a nice golden crispy crust. I needed a crusty bread because we are having crockpot soup(not husbands idea of “game food”) to watch our home town boys win the Super Bowl tonight! Great bread- will surely make again.
Thoughts on mixing in some garlic and rosemary? After the first rise or the second??
Carrie, I would add them right before I shape it before the second rise…so after the first one. 🙂
Trying this as I type!!!!
Quick question…after I’ve left the dough rise for 14hours, is it then I turn out my dough and let sit for another 20min-2hrs?
Thanks!
All directions start after the rising period, so yes. Enjoy!
Wow, look so great and so easy!! I plan on trying it this weekend! How big of a dutch oven/covered casserole do you need? And since you mentioned Pyrex in the comments, I’m guessing a glass one is ok. Do you still pre-heat the baking dish if its glass?
Anita, not very big, just a medium size will do. I haven’t tried baking it in a Pyrex dish but I wouldn’t preheat it. I think it might crack.
Ok, thanks! I’ll let you know how it comes out in the glass Pyrex!
Julia, the bread came out WONDERFULLY and was a great compliment to the boeuf bourgoignon I made. The Pyrex covered casserole worked great! I did not preheat the dish, and I buttered the bottom before putting the bread in. The crust was PERFECT! Had to be careful towards the end, as the bottom started to becomes a darker brown, but overall a delious success!
Well done, Anita and thank you for reporting back! You made my day. 🙂
You mentioned oiled pan in the instructions. Do you mean to spray the inside of the dutch oven pan??
You can spray it Clara or just brush with oil.
Jejeje…can totally relate to the yeast-phobia bcuz I’ve put off any baking that requires yeast since like forever. Don’t know why given I’ve training in how to make everything from mille feuille to creme patisserie and bread pudding! Anyway, I digress but just made this no knead, 12-hour prove bread. It is fantastic! Munching away on the still warm bounty as I write. Next time I’ll not forget to mist loaves generously before baking for an extra-crispy crust.
Thanks for the great recipe that’s so easy it’s child’s play!
In Step 5 you take the dough and fold in all 4 sides to form a ball. Then, you place it on a floured towel. Do you leave it on the towel and bake it, along with the towel?
Tara, I used the towel to cover the dough to prevent it from drying out while it’s rising but you don’t bake with it or it will burn! Alternatively, you can place it on a floured parchment paper and that you can bake. 🙂
Help! I don’t have a dutch oven! Is there any alternative to baking it?
Joelle, any casserole dish with a lid will work. Do you have a Pyrex?
I have made this bread on a cookie sheet, with cornmeal on parchment or silicone baking sheet at 450F 30_35 minutes with pan of water in oven( put in at beginning of preheating oven. You need a bit more flour to bake this way as a free form boule or round loaf, slashing top. It gets a fabulous crust, nice and golden.
Can you clarify instruction #3 on rise time? 12 to 20 hours? Thanks!
12 to 20 hours means that the dough is ready anytime within that range. It’s a very forgiving recipe. If you don’t have time to make bread first thing in the morning after 12 hours you can leave it longer up to 20 hours.
WOW! This is my first comment I have ever responded to. I must tell everyone this is the best homemade bread I have ever made. If you like a just right chewy crust and a moist inside, then you have to make this bread. You will not be disappointed. I did let my dough rise about 2 hours first. This just became my go-to bread recipe! Thank you so much for sharing your recipe. A bread to be proud of!
So pleased to hear it, Heidi! Bread making is so addicting. 🙂
Would this recipe/method of using Dutch oven work with fresh ground whole wheat flour?
Sarah, I haven’t tried but I heard that other people have and it worked. You can try and let me know how it goes! 🙂
Mine is rising! Yours looks amazing! I’m excited to try this.
I hope you love your bread as much as we did, Dacia!
Totally, totally gorgeous, Julia! Looks 100% “artisanal” as they like to say 😉 Beautiful. And I totally agree it feels amazing to bake your own bread on a whim. SO excited for you to try more!
Thank you, Cynthia! I am grinning from ear to ear. I was so pleased with the result, I baked another one and I overheard my kids talking after taking a bite, ” I think it’s the best one she baked!” That’s a stamp of approval right there. 🙂
Hello, could I use instant dried yeast in this recipe? Thank you
Absolutely
Bread scared me off as well, it took me a while to deal with it and this very same recipe was breakthrough, because there was no kneading required it was easier to get the right texture. I’m still not the brilliant bread baker, I keep killing my sourdough starters, but I can use them. My latest revelation is a book Brilliant bread by James Morton. I highly recommend it, I barely ever follow more than few recipes from my cookbooks, but I’ve already tried more than 10 recipes. Good luck with bread baking. This one looks gorgeous!
That’s so encouraging to hear, Magda! Thank you for sharing that book with me, I will be sure to look it up. 🙂
Beautiful! I love the no-knead bread. Can’t beat it for great crust. My only issue with it was that in my house, it lasted only about 10 minutes after it came out of the pot 🙂
Hahaha I totally relate to that issue, Jennifer! I had to bake another one asap!
Beautiful bread, love the ease of this recipe!
So do I, Laura! I always get inspired looking at superb bakers like you so I thought I should venture out into bread making myself!
I agree. As an x Chef retired, I have to admit I look for these recipes Simple , easy and fresh…I was not much of a baker as a Chef Pretty much not rolls and bread.
I have a lg Dutch oven & a small Dutch oven both with lids. What size should I use?
I would use the large one, Dotty!