This post contains affiliate links. When you purchase through our links, we may earn a commission.
Looking for a wedding cake or just feel like a celebration! This simple naked cake is easy to make and decorate, but keeps all the WOW factor. Read on to see how to make this stunning cake in your own kitchen!
For another stylish cake, try this Earl Grey Meringue Cake!
It is a known fact that the best tasting cake is a beautiful cake. And to me, it’s hard to top just how beautiful a naked cake can be!
These cakes have a gorgeous rustic charm that still manages to stun. Although they have famously become fashionable at weddings, there’s no reason why they can’t be enjoyed at any time of the year!
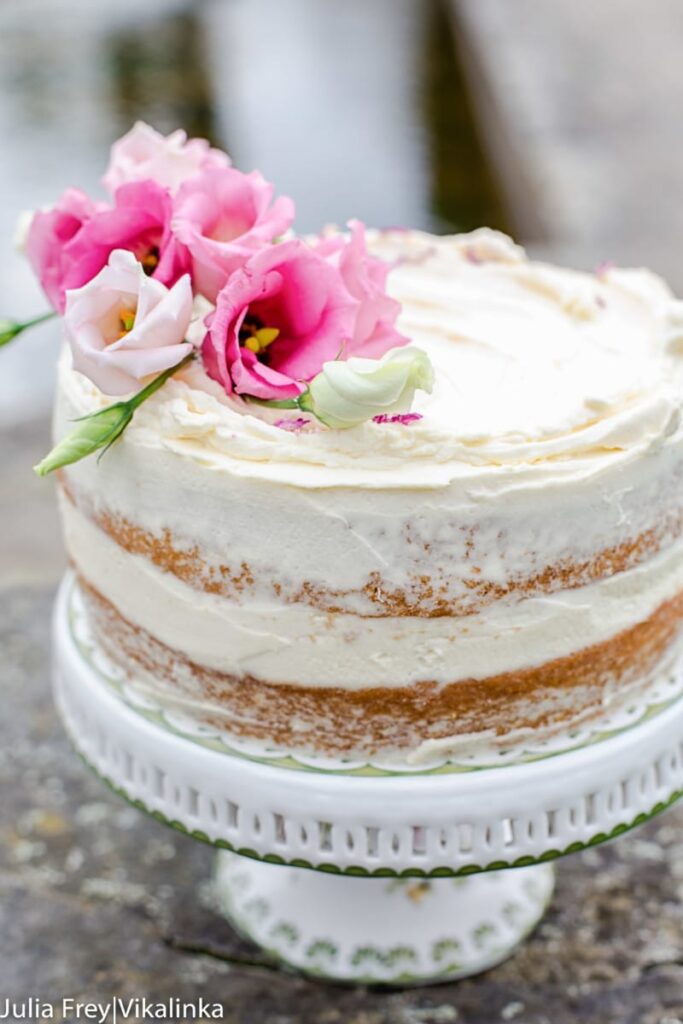
A naked cake is intentionally left without fancy decorating. This gives it the look of understated elegance, and also means that it is easier to make your own gorgeous naked cake!
Naked cake
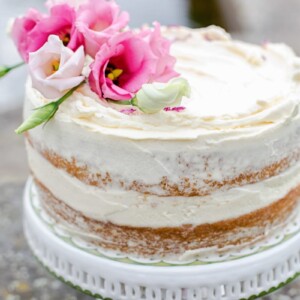
In many ways a naked cake is like any other layer cake. The significant difference is that there is little to no frosting on the sides of the cake.
This gives the cake a lovely rustic look, like it has been left artfully unfinished. It also shows off the layers of the cake rather than hiding them behind the frosting.
Naked cakes became a huge trend a few years back as a reaction to the over-styled cakes seen at weddings. The trend inevitably spilled beyond weddings, making naked cakes a common sight in all sorts of settings.
I’m a big fan of naked cakes, and not only for the unique and beautiful way they look when done well. Too much sweet frosting is more than I can take, so a cake with less is just my speed!
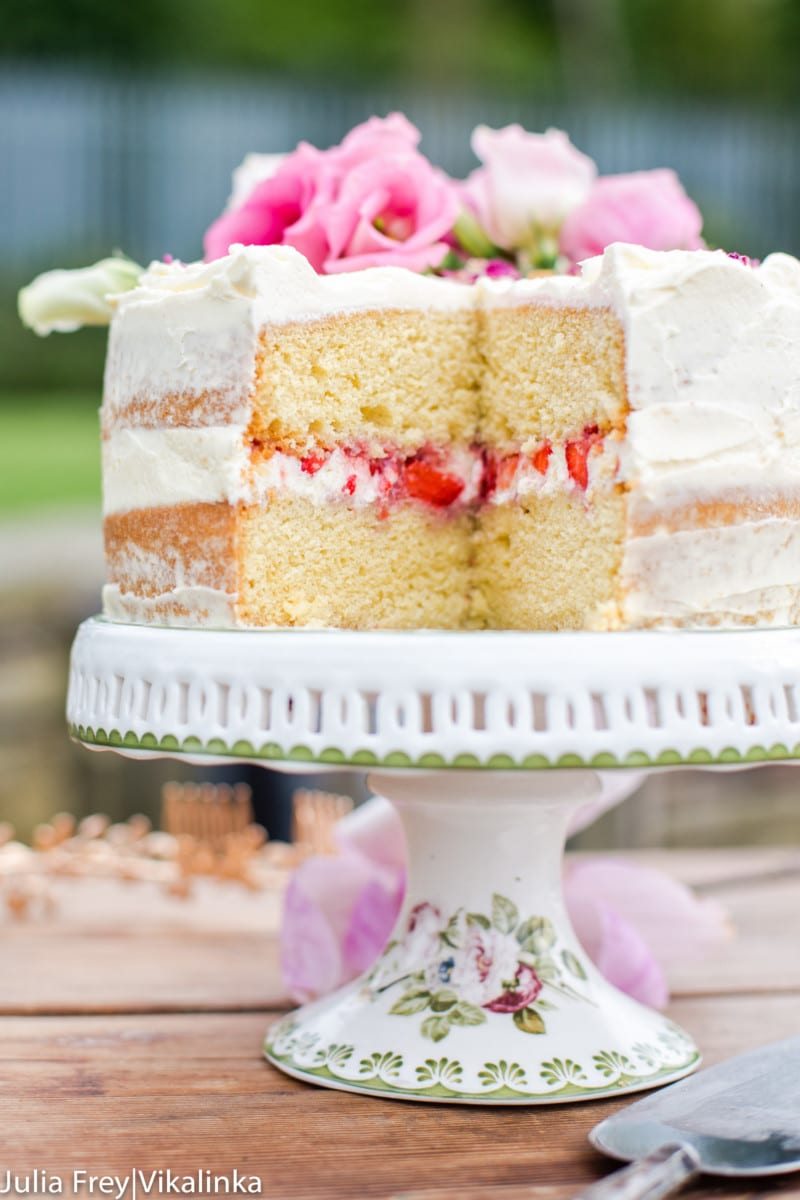
The sponge I made is something I come to over and over again when I need a no-fail cake. The sponge is light and fluffy with an intense vanilla flavour and the frosting is made of a mix of mascarpone and heavy cream, the fruit inclusion is variable.
I used strawberries for this one but you can use whatever is in season like Victoria Sponge Cake with Blackberry Compote.
How do you keep a naked cake moist?
For most cakes, frosting serves to keep moisture in the sponges. Because naked cakes have less or no frosting on the sides, moisture can escape easier and can dry out the cake if left too long.
To prevent this from happening, avoid making the cake days before you intend to serve it, or add a thin layer of frosting to the sides as I have done. This thin layer is called a crumb coat.
If you do need to make the sponge days in advance, it is best to freeze it to keep it fresh. Freezing the sponge will lock the moisture inside so it is ready to go when you need it.
I also added a good thick layer of icing between the sponges. I find this adds moisture and compensates for the reduced icing on the outside.
Assembling the cake
Start by preparing the layers of sponge. Make the sponge layers level by trimming off the domes so they are easier to lay flat. A sharp bread knife will do the trick.
Now stack the layers, adding a generous layer of mascarpone icing in between. If you decide to have more than two layers, it may be helpful to very slightly offset the middle layer. This makes it easier to achieve the semi-naked look.
Use an This is an affiliate link.offset spatula to smooth out the top layer of icing. It may be easier to achieve when using a turntable.
Now add icing to the sides of the cake, starting at the bottom and working towards the top. This is a naked cake, so don’t add a huge amount of icing to the sides.
Using a This is an affiliate link.bench scraper, smooth out the icing on the sides, leaving a very thin, fine layer behind. You may need to add very small dollops of icing as you go if any area is scraped too thin.
Once you have a smooth, rustic look on the side areas of the cake, give the top layer one more smooth down. Use a spatula to pull any excess icing coming up from the sides into the centre of the cake.
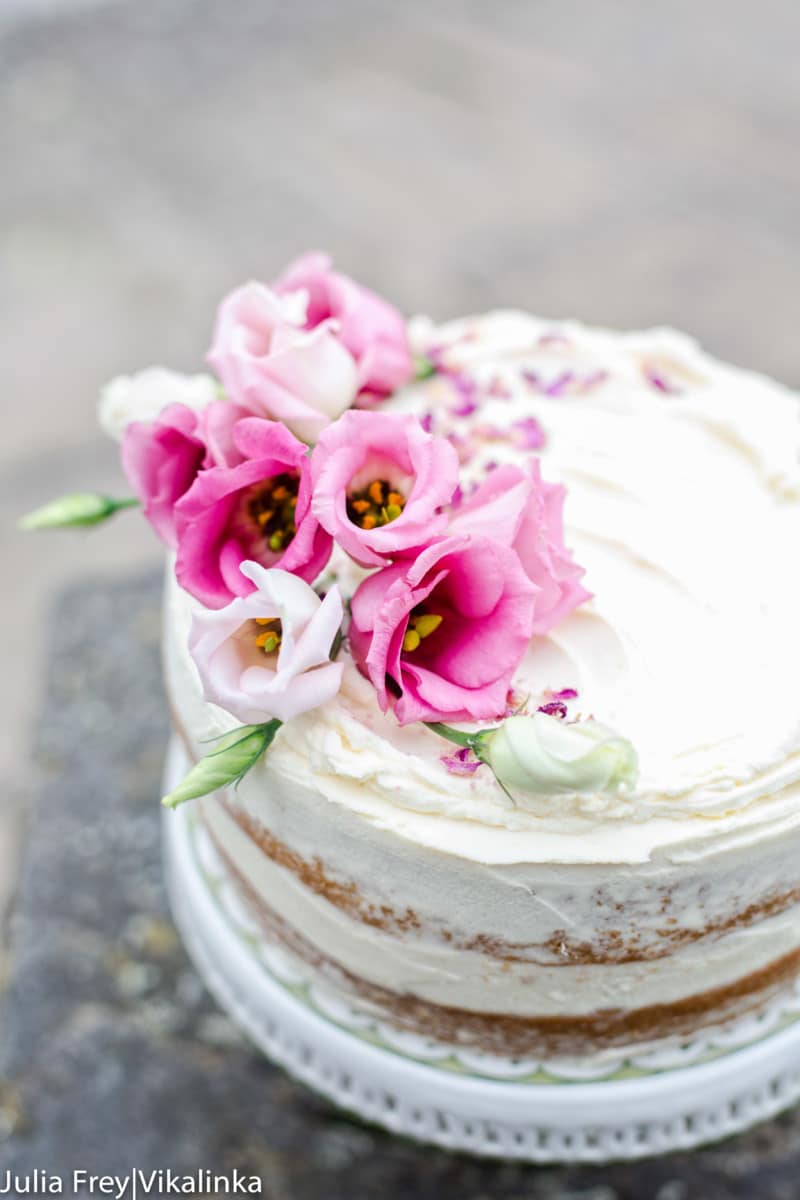
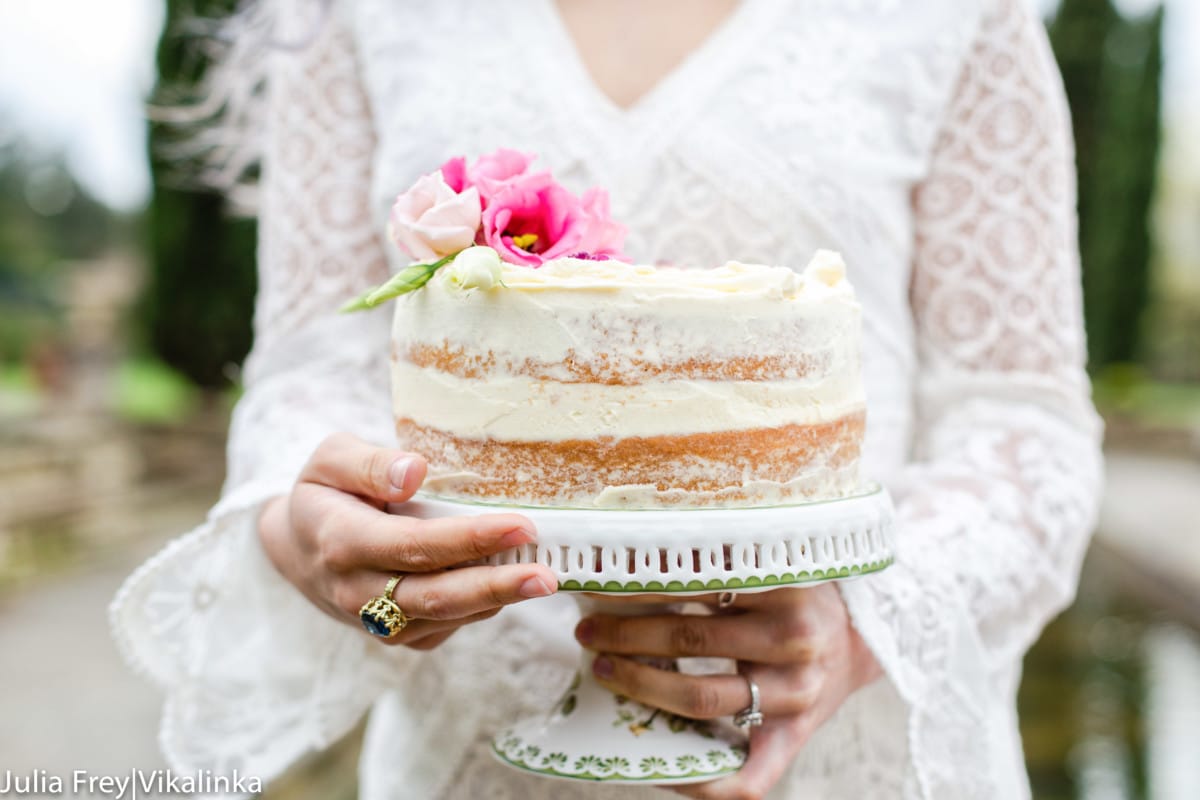
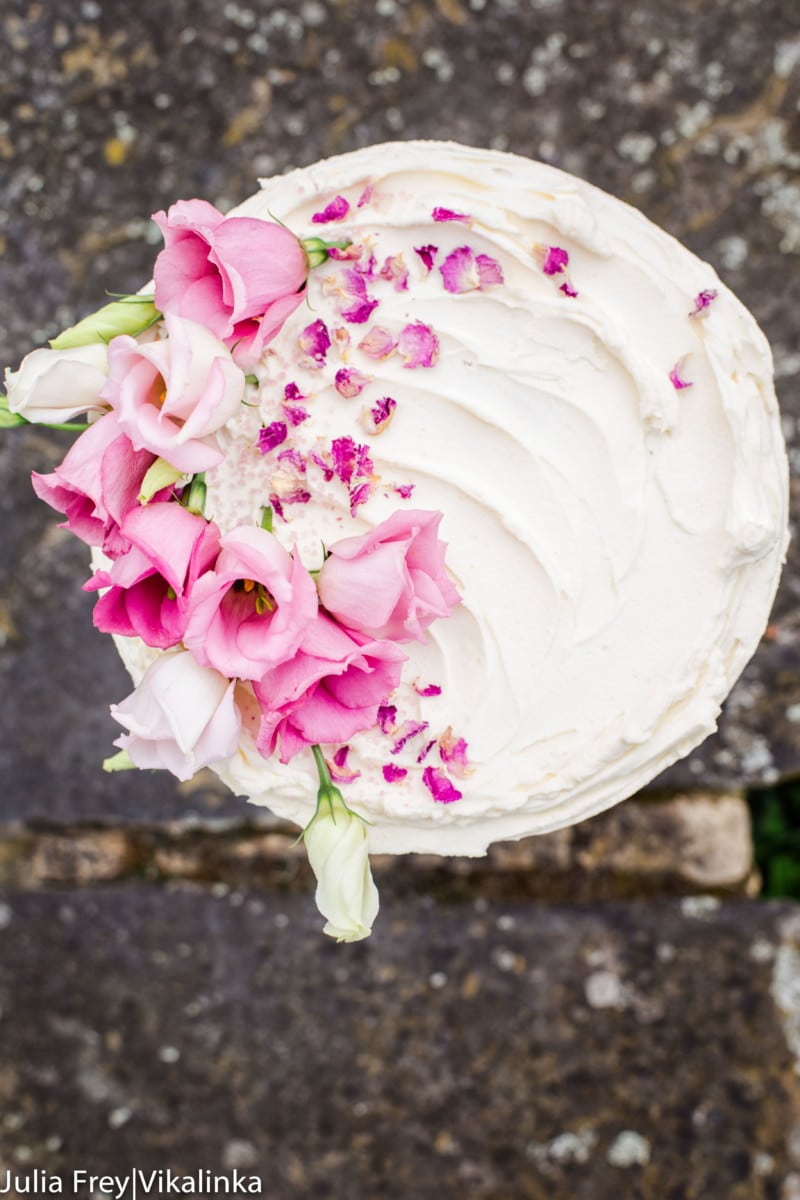
Time to add the decoration of your choice. I think that flowers are absolutely perfect for a naked cake! (Make sure you find organic flowers so you aren’t transferring chemicals to the cake!)
A lot of you have made this naked cake already and I am so happy about that! However I WANT to see your photos of this gorgeous cake! So if you make this cake, share the photos and tag @vikalinka in your instagram shots!!
Recipe Tips and Notes
- Although we instinctively trust the numbers on our ovens, the fact is that the actual temperature inside can vary widely. It’s a great idea to use an This is an affiliate link.oven thermometer to ensure that you are baking the cake at the right temperature.
- The quality of mascarpone can vary widely, unfortunately. Get the best quality cheese you can, and also the freshest. I’m fortunate to have access to mascarpone from Italy, which is made without stabilisers and has a higher fat content. Try to find this if you can.
- Decorating a round cake like this one is much easier with a This is an affiliate link.cake decorating turntable. A great kitchen gadget for any baker to have on hand!
Storage and leftovers
Keep leftover cake in an refrigerated in a cake storage container so it doesn’t dry out or absorb flavours from your fridge. If you don’t have a cake storage container, plastic wrap can also work.
The mascarpone icing is going to limi how long the cake can be stored. The cake will keep for 3-4 days when refrigerated. Take it out of the fridge around 30 minutes before serving so it can come to room temperature.
More cake recipes
- Black Forest Cake
- Rose Rhubarb Layer Cake
- Elderflower and Lemon Cake
- Black and White Chocolate Cake with Blackberry Compote
Naked Cake with Mascarpone Cream and Crushed Strawberries
Equipment
- This is an affiliate link.Springform pan set
- This is an affiliate link.Stand mixer
- This is an affiliate link.Mixing bowls
- This is an affiliate link.Offset spatula
- This is an affiliate link.Bench scraper
- This is an affiliate link.Cake decorating turntable
Ingredients
For the cake
- 250g / 1 cup butter, softened and unsalted
- 250g / 1⅓ cup caster sugar
- 4 eggs, large
- 1 tsp vanilla bean paste or extract
- 250g / 1¾ cup flour
- 2½ tsp baking powder
- ½ tsp baking soda
- ½ tsp salt
- Zest of 1 lemon
For the mascarpone cream
- 250ml / 1 cup mascarpone, chilled
- 60g / 1/4 cup icing sugar
- 175ml / 3/4 cup double cream
- 1 tsp vanilla bean paste
For the crushed strawberries
- 250g / 2 cups strawberries, quartered
- 100g / 1/2 cup sugar
- Organic flowers, dried rose petals and pink sprinkles for decoration
Instructions
For the cake
- Preheat the oven to 180C/350F, grease two 8"/20cm round cake pans and line with parchment paper, set aside.
- In the bowl of a stand mixer cream softened butter with sugar until light and fluffy.
- Start adding eggs one by one, whipping until well combined after each addition for about a minute. Add vanilla bean paste and lemon zest.
- Combine sifted flour, baking soda and powder and salt in a separate bowl. Add the dry ingredients to the wet ingredients and mix well, stopping the mixer and scraping sides and the bottom of the bowl.
- Divide the batter between two pans. Weigh them to get exactly the same cake in size. Bake in the oven for 30-35 minutes or until cake tester comes out clean.
- Remove from the oven and set on a wire rack to cool for 20 minutes, then remove from the pan and cool completely.
For the mascarpone cream
- Whip chilled mascarpone with icing sugar and vanilla bean paste for 1-2 minutes until well combined.
- Then add double/whipping cream and whip for 2 more minutes until stiff.
For the crushed strawberries
- In a small bowl mix 1 cup of quartered strawberries with ½ cup of sugar and crush them gently with a fork until they resemble a rough, juicy mash, add the remaining cup of strawberries for more texture and mix.
Cake assembly
- To assemble the cake spread 1/4 of mascarpone cream on top of the bottom layer of the cake. Dab the crushed strawberries all over, they shouldn’t cover the entire cake, then add more mascarpone cream directly on top of strawberries and level everything with a cake spatula. Cover with the second cake layer.
- Cover the entire cake with the remaining mascarpone cream, making pretty swirls on the top of the cake, and then using an offset spatula scrape the mascarpone cream off the sides of the cake to reveal the sponge, thus creating the “naked cake” effect. Decorate the top with organic flowers, rose petals, sprinkles etc.
Nutrition
Nutrition information is automatically calculated, so should only be used as an approximation.


Hi I’m about to try to make this cake. Can I use vanilla extract instead of the paste in mascarpone cream? Also I’ll have to use 2 9” pans instead of 8”. Should I increase the ingredients or will that be fine?
Kind regards
Giovanna
You can definitely use vanilla extract, Giovanna. I haven’t tested with 2 9″ pans but guessing it should be fine. Do let me know how you get on. Best of luck!
Beautiful cake! I plan to make this for my wedding, would it work as 2 tiers using dowels and a cake board?
It’s not a very large cake, Sue but you can double the recipe to get a 2 tier cake.
Hey what sort of flour do you use? Plain? Thanks
Yes, plain flour. In fact I use Canadian Bread Flour from Sainsbury’s for everything.
Hello from Czech republic! 🙂 I wanna say big Thank you, because I made your cake this weekend for b-day celebration and it was delecious! I used mango instead of strawberries. I believe, that strawberry flavor would be better, but mango works too 🙂 i will make it again soon 🙂
So great to hear the cake works with mangos as well. Thank you for sharing this with me, Martina!
What a lovely cake!
The mascarpone cream is delicious!
What sugar do you use with the strawberries?
Thank you
Thanks so much, Emma! I use white granulated sugar but I am sure a bit of brown or vanilla sugar would add another layer of flavour.
I’m thinking of making this cake for a birthday and I was wondering what kind of flowers did you use
Hi Aoife, these delicate rose like flowers are called lisianthus and are safe to decorate with as they are non-toxic for humans or animals.
Hola Julia, lamento decir que el día de hoy hice dos veces la receta de los bizcochos y en las dos ocasiones salieron mal, hundidos totalmente y he notado que la masa está un poco amarillenta, la cual no me explico el por qué. Pensé en escribirte por si me puedes orientar por qué pasó esto, no se si los ingredientes están bien o falta alguno ? Note que las medidas de algunos ingredientes no coinciden con los gramos, please help me
Saludos, Ross
Hi Ross, there are many reasons why cakes sometimes fall in the middle. If there is too little moisture in a cake, it can fall in the center. However, too much moisture can also affect a cake. This commonly occurs in humid climates, where added moisture can collect naturally in ingredients such as flour. When this occurs, a cake can rise rapidly and then fall during baking. It can also happen if you open an oven door too early in the baking process or close the oven door too sharply. I can assure you that the gram measurements are correct in this cake. Best wishes, Julia
Hi, I want to make this cake for tomorrow’s birthday party, should I make today and refrigerate until tomorrow evening or I should make tomorrow morning? And decorate before serving or after finishing cake?
Thanks!
I find it easier and less stressful to bake the day before and keep the cakes wrapped in plastic wrap and refrigerated overnight, then decorate on the day of celebration.
I was so nervous to make this (baking is not my forte). It turned out AMAZING! I followed the directions exactly and had no issues. I used 3- 9 in pans and made 1.5 x the cake recipe. I doubled the frosting which was the perfect amount. This frosting will now be my go to- it was divine! Because the cake is dense, I had no problems with crumbs while frosting and loved that they came out so flat that I didn’t have to shave any off before stacking. This was a big hit at my daughters 18th birthday and looked elegant with the fresh flowers on top. I will definitely be making this again. Thank you!
Thank you so much for this amazing feedback, Heidi! I could almost feel your excitement and sense of pride as I was reading it. Cakes are not easy unless you make them all the time and you did so well! 🙂
I am looking forward to making this cake. Is there supposed to be buttermilk or milk in this recipe. Cheers. You look amazing 💕
Hi Cheryl, the recipe works as written. Enjoy!!
I had the same question. I followed exactly – tasted delicious but was dry
Hi Sophia, there is a chance the cake was slightly over baked if it was dry.
I made this recipe twice and it didn’t rise like a regular cake. Is it supposed to be dense? The flavor is incredible though. I’m trying to make it for my moms 70th birthday party in a few weeks. Help!
Hi Heather, this classic English sponge is a bit more dense than an American sponge cake, and definitely more dense than cakes you’d get from a box. It should rise though. I would say it increases in height by a third after baking. My main piece of advice would be not to rush the beating of sugar and butter together. That’s where you incorporate air in, that will later result in a better rise. The consistency of beaten sugar and butter should be smooth, not gritty with sugar, very light and fluffy, almost like a buttercream icing. I hope this helps!